Starting a little recap on the work finished so far on King George III.
The very first thing I bought was a large plastic “for rent” sign for the crown. I don’t remember the total dimensions, but the long edge was 24”. I wanted strength and flexibility, without the cost/hassle/weight of metal. To make a pattern, I found some decently high-res photos that allowed me to zoom in to about life-size (which I gauged by roughly comparing my eye measurements to his in the photo), and from there I measured EVERYTHING: widths, heights, angles, distances between pieces, etc. Using the measurements and the same photo references I drew a pattern for all the pieces and cut them from the plastic sign. After I tested them on my base hat, I realized the sheet wasn’t quite long enough for the length of the horizontal sections that go around the head, so I went back and cut some extensions for those pieces.
 |
| Crown pieces |
I ended up with a bunch of 1” strips (two for the arched vertical strips, one for the horizontal strip, a shorter horizontal extension, and extras), the horizontal cross/fleur strip plus extension, and two 2.25” crosses for the top of the crown.
All the edges and surfaces were sanded to remove burs and prep for glue/paint.
I've also ordered a TON of various beads and filigrees and gems and rhinestones that go all over the crown - 17 different kinds so far. As they've been arriving I've been doing some mockups on the pattern pieces to test sizing and get an idea of how it'll look. I'll go into more detail once I have them all and start gluing them on.
 |
| Crown top cross |
 |
| Crown band cross |
Testing various things and figuring out the logistics of assembly (mostly in what order) took a while, but last week I finally glued the cross extension in to the horizontal cross/fleur section with E6000.
I’ve also finally figured out assembly on the cross and pearls for the top, so that’ll probably be next.
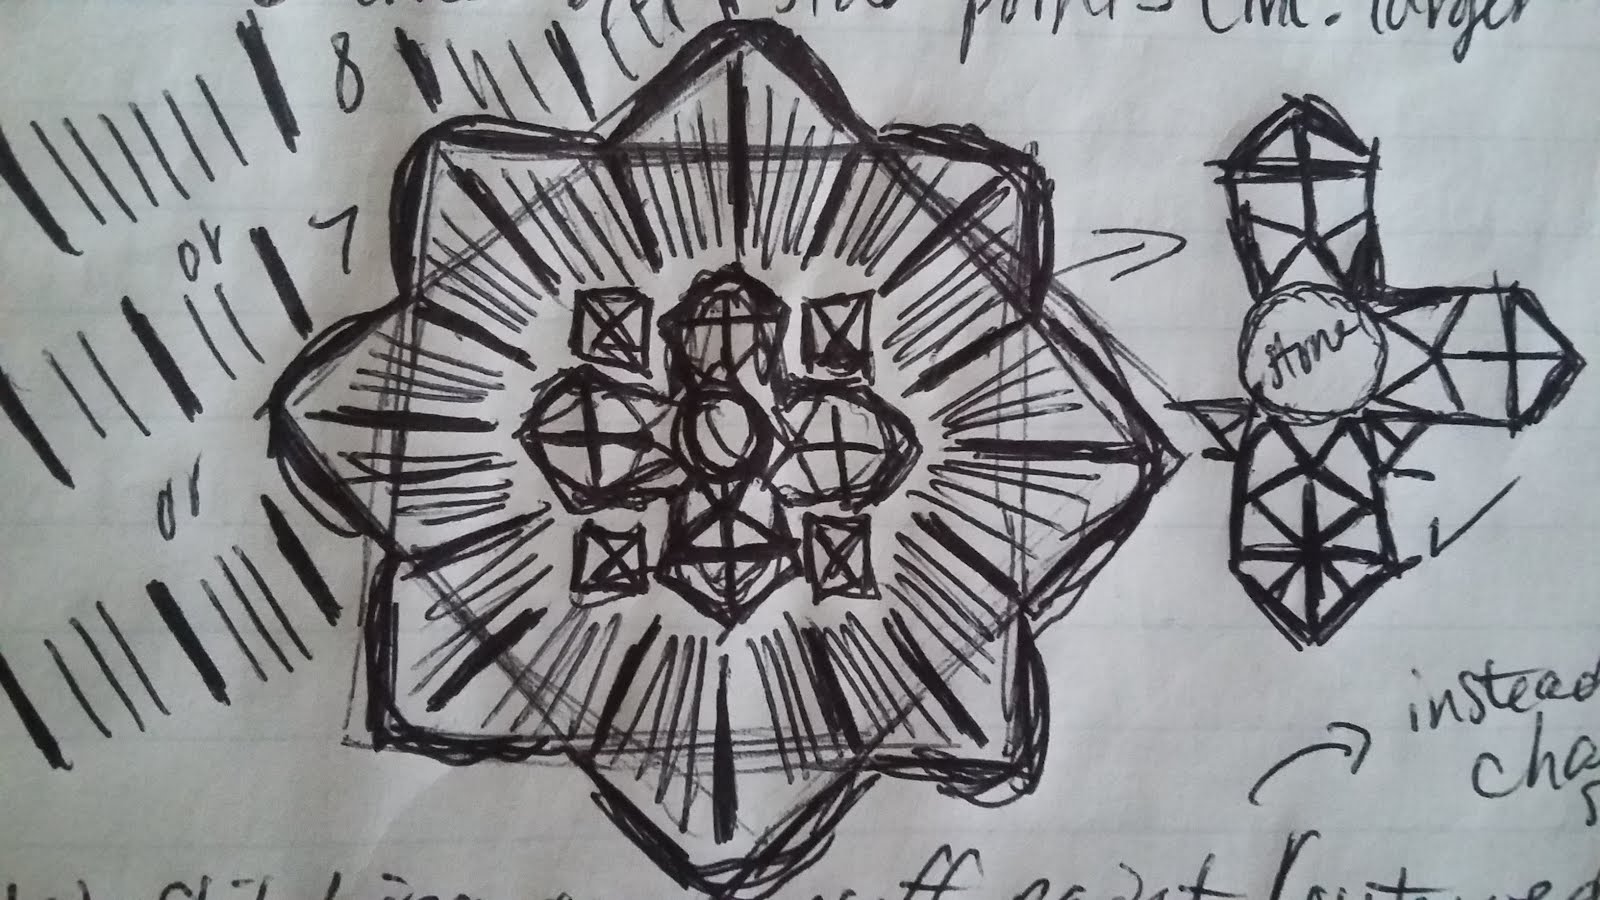
For most of the collar it was easy to find various metal jewelry-making pieces, but the eight-point star and Maltese cross in the center were more particular so I had to do those partly from scratch. I patterned and cut them the same way and at the same time I did the crown pieces.
 |
| Collar star pieces |
I did manage to find a die cut paper star that was the right size and shape, so I bought that as both a pattern to cut the plastic from and a top layer to add in the detail (saving me the trouble of etching the plastic; essentially the plastic is just a thick reinforced backing). I didn’t take a photo of the star before I started assembling, but this is the seller’s photo of the whole sheet (I used the bottom left). It’s neat stuff.
The small little bits in the center were just guesstimated and improvised from the shapes in the reference photos, and those were glued to the cross with E6000. The paper star, plastic star, and cross were all attached with either hot glue or E6000 (had them both out at the time, and now I don’t remember which I used for that). The cross has a slightly raised edge, which I did with puff paint.
The medallions on his collar look sort of tiered, so I planned to buy large flat settings for the base, medium raised/detailed settings to go over that, and small settings for the red stones in the center. The first large settings I bought didn’t work (they were solid so punching holes for rings was a hassle), so I bought replacements that had looped edges and better surface for gluing.
 |
| Top left: original 38mm setting. Top right: new 38mm setting. Bottom: 30mm detail setting. |
 |
| 30mm detailed settings, 38mm flat looped settings, 11mm cabochons, 11mm cab settings. |
The large and medium settings were glued together, and the stones were glued into their settings, all with E6000. I’m still deciding whether or not to paint the settings gold to match the bows I’m making/painting, so for now the large/medium pieces are partly taped over and separate from the stones.
 |
| Red cabs glued into their settings, and 30mm settings glued to the 38mm. |
The bows were shaped by hand from twisted picture-hanging wire (the kind that comes in the little packages with screws and stuff). I did more measurements from the same zoomed-in crown/collar photo and drew out a pattern, and I laid the wire over that pattern as I shaped it. The loops and upper tails are one piece and the center tails are a separate piece, attached to each other with thin wire for now. Once they’re all done I’ll remove the wire, glue the pieces with E6000, and then rewire a little more neatly/lightly.
Painting on everything (both crown and collar) is just waiting on getting a clear coat and testing it with the paint I already have.


 Ideally I would have used red fabric, but I didn’t have any in my stash. What I *did* have was red fabric paint and cotton scraps so I just used that instead. Once that was dry and heat set, I drew on the design (partly traced from the collar’s similar eight-point star piece) and popped it in the hoop.


