I don't even remember when this idea first happened, but in a moment of delusion a few months ago I decided this year's Labyrinth Masquerade was a good time to do our dream project of Beetlejuice and Lydia a la 18th century.
For the most part, the movie costumes will be translated fairly directly to 18th century fashion, with some embellishment of the film designs and thematic/dramatic exaggeration of historical accuracy. Beetlejuice will be a little dated in some amalgam of a 1770s-1780s zone-front gown with a redingote collar mirroring his suit. Lydia will be more fashion-forward in a mid-1780s chemise gown to mirror her blousy dress.
I'm using Simplicity 8161 with American Duchess's historical hacks as a starting point for Beetlejuice, and I'll be using the same chemise gown pattern from French Revolution Zombaes for Lydia with some added ruffles.
Everything's kind of at odds and ends right now. I've ordered Lydia's lace trim and we've got Beetlejuice swatches on the way, and I've been slowly gathering little accessory pieces and working on what we already have.
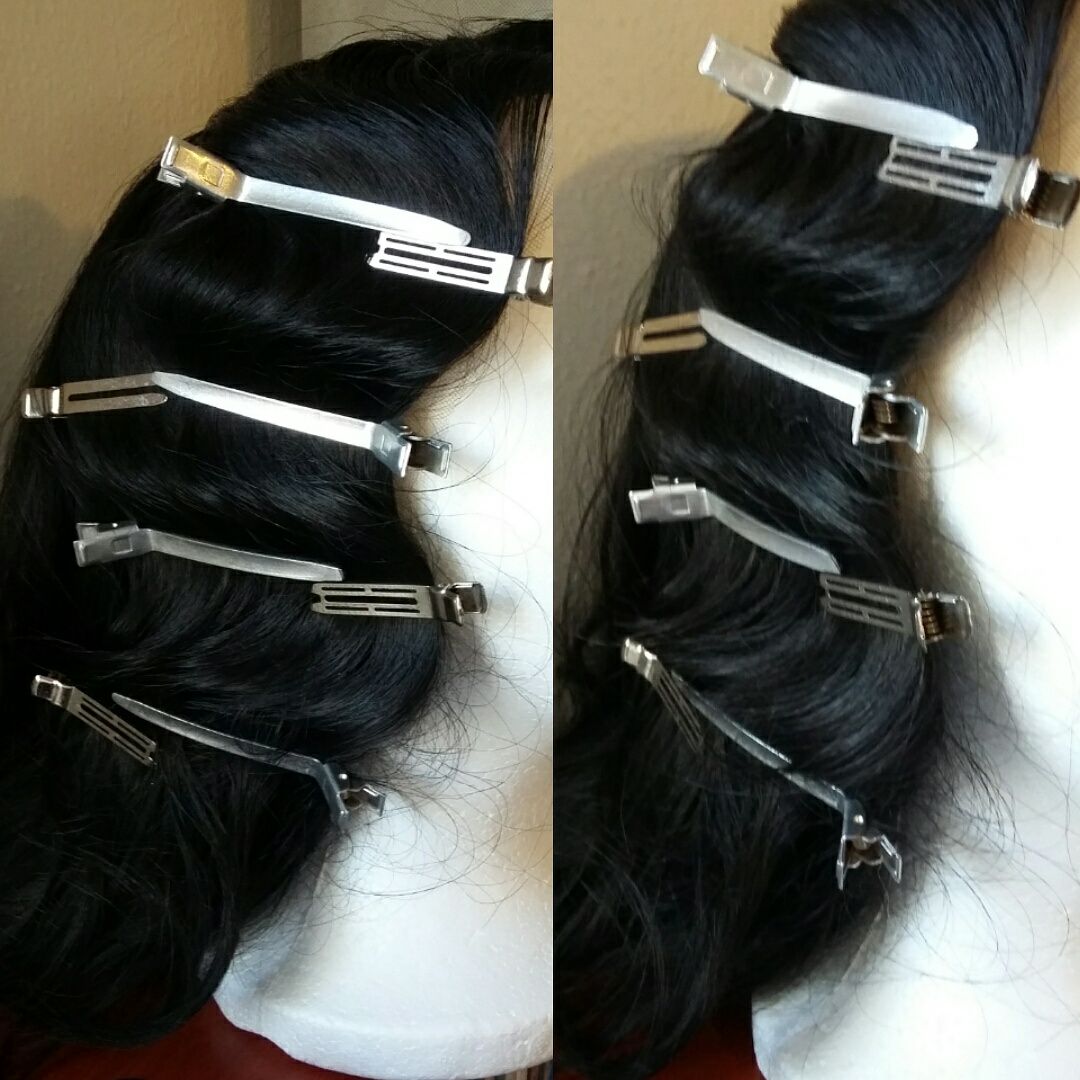
For Lydia's hair, I'm reusing my most recent hedgehog wig that I initially styled for HB Revolution earlier this year (more on that someday). The wig came with bangs which I removed, but because I'm a craft hoarder I saved the wefts so I was able to easily stitch some of them back on.
I unexpectedly found some amazing little bugs (crickets and locusts) at a small craft store during a recent visit home. Not completely sure what to do with all of them yet, but some will definitely go in Beetlejuice's hair and maybe in a few strategic places across the costume (I'm thinking on the shoes will be fun).
Luckily between everything from French Revolution Zombaes last year and the extra petticoats I did for HB Revolution this year, all the undergarments are already done which makes a project of this size feasible at all.
And because this is a big project, like French Revolution Zombaes last year, I'll probably break up the posts into topics.
Stay tuned!
Current Projects
Showing posts with label Hair/Makeup/Wigs. Show all posts
Tuesday, June 18, 2019
Saturday, October 27, 2018
French Revolution Zombaes - Finished!
As per usual, I fell behind on documenting progress while I was busy making it. To make some attempt at recap...
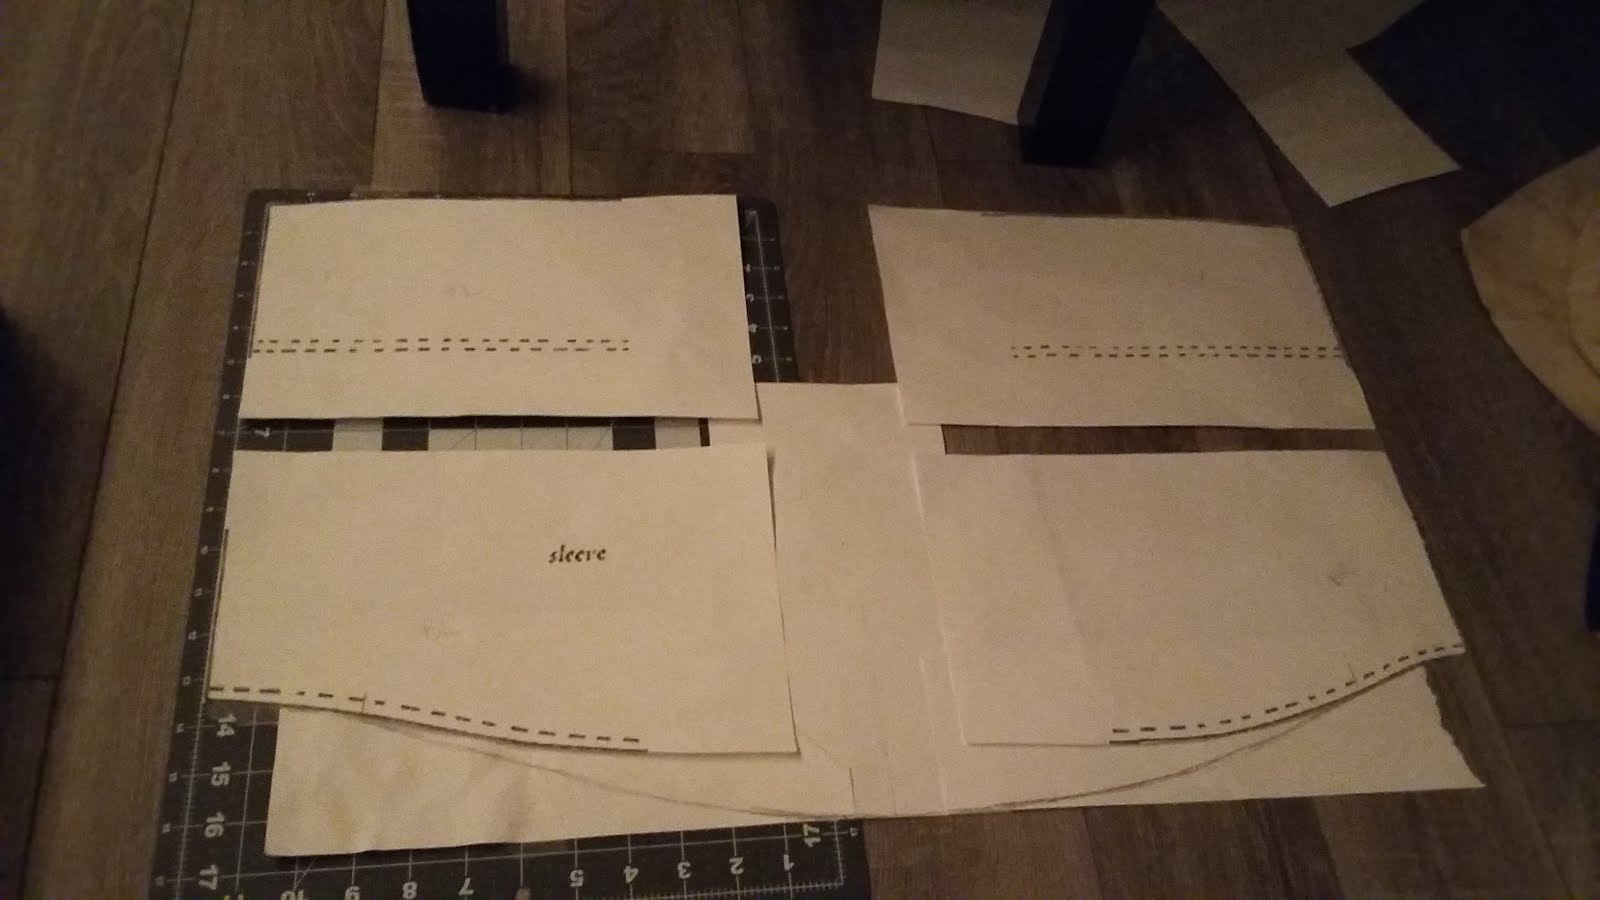
The only photo of the dress construction I have is the sleeve pattern, which was scaled up from the Norah Waugh pattern.

Figuring out patterning and construction on my own was a challenge, and frustrating at times. I'm fairly experienced with sewing, but I still prefer established patterns and instructions that I can modify as needed but have a foundation to refer back to. But it was a really good learning experience, even if I didn't always love it, and it came together wonderfully in the end.
I also made petticoats, roughly following American Duchess's old tutorial. So. Much. Pleating. But it was fun once I figured out the spacing.

We got our stays in plenty of time, and they were incredible! I did a fit/wear test right away and loved it.
As far as finishing a single piece, the wigs were probably the quickest part of the whole costume. I started with the Boogie Babe wig, which turned out to be a great cheap alternative to the Lioness wig so many people use (though I still want to get my hands on one of those someday).


There wasn't much organized method to it. I just separated and broke up the curls, and teased as I trimmed, using historical portraits as reference. I left the lower back at the base of the neck long and straightened then recurled the hair into about six sausage curls. Once styled, the wigs were sprayed with silver and then white hairspray from a party store. Since we were blending our real hair into the wig to hide the hairline, we needed something heavy to help cover and blend the different real versus fake hair colors. The silver was more opaque, so it did a pretty good job of this (though we didn't spray quite enough on our own hair the night of), but it was very silver. The white over the top helped hide it and soften everything, but some still showed through. It didn't wreck the look, and it worked okay with the ghostliness and the silver jewelry, but it wasn't what I intended. The white on its own looked great and actually replicated the look of powder really well, so that's something I'll be doing on other 18th century wigs in the future.

I don't really have any photos of them, but the "mitts" were $1 knee-high stockings bought just a day or two before the event. Everything else struck out, and they were a lifesaver. I literally just cut finger holes, and the tears and runs that developed just added to the creepy ghost/zombie theme.
And that's pretty much it!

A lot of stuff came down to the wire, we got a later start than we intended, and we went down to the party a few hours late. But it got done and we wore it and it was awesome! For being such an elaborate and fussy looking finished product, they're ridiculously comfortable. Even in the the short time we were there, a lot of people loved our costumes, and a surprising number actually got the whole theme. Seeing their eyes go wide with recognition was really gratifying. We got a lot of compliments on the wigs, too, which was great. We're definitely busting these out again. On these in particular, we're going to work on distressing them and making them more zombified (they were more ghoulish/ghostly this time, which actually worked well as its own thing, too). I'm also going to eventually make another set of chemise dresses with the same design and a bit more accuracy to wear to reenactment events.
I'm already on to the next project (big things afoot), so more on that soon!
The only photo of the dress construction I have is the sleeve pattern, which was scaled up from the Norah Waugh pattern.

Figuring out patterning and construction on my own was a challenge, and frustrating at times. I'm fairly experienced with sewing, but I still prefer established patterns and instructions that I can modify as needed but have a foundation to refer back to. But it was a really good learning experience, even if I didn't always love it, and it came together wonderfully in the end.
I also made petticoats, roughly following American Duchess's old tutorial. So. Much. Pleating. But it was fun once I figured out the spacing.

We got our stays in plenty of time, and they were incredible! I did a fit/wear test right away and loved it.
As far as finishing a single piece, the wigs were probably the quickest part of the whole costume. I started with the Boogie Babe wig, which turned out to be a great cheap alternative to the Lioness wig so many people use (though I still want to get my hands on one of those someday).


There wasn't much organized method to it. I just separated and broke up the curls, and teased as I trimmed, using historical portraits as reference. I left the lower back at the base of the neck long and straightened then recurled the hair into about six sausage curls. Once styled, the wigs were sprayed with silver and then white hairspray from a party store. Since we were blending our real hair into the wig to hide the hairline, we needed something heavy to help cover and blend the different real versus fake hair colors. The silver was more opaque, so it did a pretty good job of this (though we didn't spray quite enough on our own hair the night of), but it was very silver. The white over the top helped hide it and soften everything, but some still showed through. It didn't wreck the look, and it worked okay with the ghostliness and the silver jewelry, but it wasn't what I intended. The white on its own looked great and actually replicated the look of powder really well, so that's something I'll be doing on other 18th century wigs in the future.

I don't really have any photos of them, but the "mitts" were $1 knee-high stockings bought just a day or two before the event. Everything else struck out, and they were a lifesaver. I literally just cut finger holes, and the tears and runs that developed just added to the creepy ghost/zombie theme.
And that's pretty much it!
![]() |
| With our awesome new friend, Lady Toxie. |

A lot of stuff came down to the wire, we got a later start than we intended, and we went down to the party a few hours late. But it got done and we wore it and it was awesome! For being such an elaborate and fussy looking finished product, they're ridiculously comfortable. Even in the the short time we were there, a lot of people loved our costumes, and a surprising number actually got the whole theme. Seeing their eyes go wide with recognition was really gratifying. We got a lot of compliments on the wigs, too, which was great. We're definitely busting these out again. On these in particular, we're going to work on distressing them and making them more zombified (they were more ghoulish/ghostly this time, which actually worked well as its own thing, too). I'm also going to eventually make another set of chemise dresses with the same design and a bit more accuracy to wear to reenactment events.
I'm already on to the next project (big things afoot), so more on that soon!
Thursday, July 5, 2018
French Revolution Zombaes - Testing and Prep
You wouldn't know it from my activity here, but I've actually been really busy with costuming! I've been steadily working on French Revolution Zombaes, but because everything's being budgeted and I'm waiting on stuff to arrive, I've been picking away at different parts of the costume bit by bit. So I initially thought I'd wait until I had whole chunks done to post about them. Some things are finally coming together now, but even though there's nothing totally done, Labyrinth is just shy of two months away. So I thought I'd better get to it!
It's been an ongoing and evolving work in progress, but in the the last few weeks I finally got down on paper what I've been thinking about for a design.
Dress:
-white cotton voile, possibly over a black satin-y lining
-3/4 "poofy" sleeves
-single drawstrings at the neckline and waist
-ruffles at neckline, sleeves, and hem
-ribbon waist sash (probably moire)
Hair:
-very large hedgehog (probably a wig)
-fascinator thing with at least two ostrich plumes, a rhinestone brooch, and a black ribbon bow
Jewelry:
-Marie Antoinette mini portrait on a bow
-"MA" lady-in-waiting badge on a bow (inspired by contemporary Russian examples)
-large rhinestone earrings
-large rhinestone necklace worn at the neckline like an oversized brooch
-several rhinestone rings
-SO. MANY. RHINESTONES.
Makeup:
-either general deathly pallor, or pallor with early/minimal zombification rot
-light dirtiness from crawling out of the grave
-prosthetic appliance for the stitched-up decapitation
Of course I already have the Marie Antoinette portraits I made way back. I'm still tempted to redo older Marie, either with a different portrait entirely (why, oh why, did I not think to use her infamous chemise gown portrait???) or at least a better quality print. But that'll come down to last minute tweaks.
I also have little crown brooches to add to the centers of the bows, and I might add more ribbon too (the theme with almost everything on this project so far has been "when in doubt, add more"). All the jewelry really needs a post of its own, so more on that later.
And typically, everything else is a lot of mockups and prep and waiting right now.
Back in May I ordered 1780s stays from Historical Designs on Etsy.
They'll be plain coutil, with front and back spiral lacing. Her work looks and sounds amazing and I'm beyond excited to get my stays in the next few weeks.
I can't properly start the dresses or petticoats until the stays are in hand, so in the meantime I've been focusing on accessories, starting with the bum pads and pockets. The cost for both was basically nothing, as I used old fiberfill and scrap fabric, which was awesome. I used Simplicity 8162 (the first American Duchess underpinnings pattern) for the bum pad, and Simplicity 3635 for the pockets. Both are fairly straightforward so there's not much to say or show, but I did make a few experiments and tweaks.
On the bum pads, I made the first one in the largest size thinking bigger is better - and it is, with caveats. I initially overstuffed it, and both it and I didn't look right while it was worn (very stumpy and stocky, which is already a problem for me being short, high-waisted, and curvy). So I made the second one in a smaller size and stuffed it more conservatively, then pulled some stuffing out of the larger pair and it too looked much better with less stuffing. The two sizes really only differ in how far they wrap around to the side and front of the hips: when viewed from the front, the larger size gives a little more width. As it turns out, having two sizes was perfect. My friend and I have the same hip measurement, but our proportions are different: she has wider hips, I have more butt. So with appropriate stuffing in each bum pad, the smaller size with volume concentrated in back was better for her, and the larger size with some extra volume on the sides worked better for me.
On the pockets, instead of using bias tape for the opening and outer edge, I did a facing on the opening (adapted from the Simplicity 4923 shirt) and just sewed a normal right-sides-together seam along the edge. There was honestly no reason for this except that I didn't have any bias tape and was too cheap/impatient to go out and buy some. I had plans to embroider Marie Antoinette's initials on the pockets, either by hand or machine, but that didn't pan out. I do want to make another pair someday, so I'll definitely try embroidery next time.
Both the bum pads and pockets are kind of 99% finished and tucked away right now and waiting some last minute tweaks, namely checking the fullness of the bum pads when all the petticoats and dresses are done to see if they need more oomph to support the weight. So I'll get finished photos when everything's assembled.
With those base underpinnings done, I did eventually make a rough mockup of the dresses to get an idea of what my game plan was. I primarily used Fresh Frippery's awesome tutorial, as well as looking at the chemise gown American Duchess made from it too. The tutorial calls for three lengths of 55" fabric, or 165" total circumference, and I had ordered enough to account for that. But I'm playing with the idea of adding a black lining (for more dimension, and it gives a nice spookiness factor), and as American Duchess advises, 165" is very full to begin with and the thicker the fabric, the bulkier the dress. The lining I'm thinking about is the same fabric I used for the Lucille Sharpe nightgown, and luckily I had some yardage left over. So I made two mockups of 165", one with a lining panel sewn into the front and one of just voile.
The mockup with the lining wasn't terribly puffy, and maybe I could have gone with 165" and been fine, but after the bum pad puff debacle, I decided to cut down the fullness and scale it back to the 138" given for the chemise gown in Norah Waugh's The Cut of Women's Clothes: 1600-1930. I've seen lots of people make that version and they turn out perfectly suitably full. I tested the voile-and-lining mockup at 138" and liked it, so I cut the just-voile mockup down to 138" as well so they're both prepped for eventual construction. I ended up with something like this...
It's kind of strange - and honestly really great - how quickly during construction these dresses come together and actually look like what they are, even without the sleeves and finishing.
Even though I'm happy with the 138" circumference regardless, I'm still undecided on the lining. I'm not too worried historical accuracy, as these are zombie costumes, after all. I want things to look basically era-correct, but some artistic license is required. And they'll be torn and weathered, so there's also no need to consider HA for the sake of wearing these to reenactment-type events (I'll eventually make proper versions for that). I do really like the look of the black underneath, but it's just not at all actually necessary. The decision may ultimately just come down to time and money; there are still a few essential things to make and buy that take precedence.
Just yesterday I did a mockup of the shift using Simplicity 8579 (American Duchess's newest underpinnings pattern). Not really anything to show there, at least until I have the finished shifts done. I do need to decide if I'm going to do the HA French seams, or just say "eh" and leave them raw or finish them with overcasting or something. The pattern went together really well, and despite being worried that the pattern size I'd bought was too small, with the ease it ended up being almost a perfect fit (aside from bust, which stays will deal with; and upper arm, which I can adjust to be roomier).
I've also done one hair test. I'm not into the idea of HA pomatum and powder products right now (see a trend with this project?), so I researched and asked around for modern equivalents. I ended up using Murray's Superior Hair Dressing Pomade from a suggestion by American Duchess, and plain ol' all-purpose flour because it was the closest thing I already had in the house. I didn't really follow any one tutorial, as I used a lot of different sources and research, but the videos by The Dutch Milliners and historical portraits were especially helpful. I put the pomade in my hair while it was damp, then let it mostly dry before curling it very small sections with the smallest foam rollers I had. After setting overnight, I took the curlers out and let the hair relax. With more pomade on my hands, I broke the curls apart, then powdered everything - focusing on the roots - with sifted flour and a fluffy brush. I pinned the top into a sort of bouffant, then pinned the sides into place where I wanted them.
I think I need to use more pomade and a finer powder, and the sides need more teasing or rats for support. But I'm really pleased with it as a first attempt, and I think it'll be a good technique for more realistic historical costuming someday. Ultimately I don't think it's big enough for this project, though, which is all about excess and taking things to the extreme limit. So I'll probably be getting a wig (likely the Lioness wig everyone else seems to use to great effect) just to make it that much more extra.
In anticipation of building huge hedgehogs, I got a bunch of mesh bun donuts to cut into oblong rats to support and fill out the sides better.
Coming up next: SO. MANY. RHINESTONES.
It's been an ongoing and evolving work in progress, but in the the last few weeks I finally got down on paper what I've been thinking about for a design.
Dress:
-white cotton voile, possibly over a black satin-y lining
-3/4 "poofy" sleeves
-single drawstrings at the neckline and waist
-ruffles at neckline, sleeves, and hem
-ribbon waist sash (probably moire)
Hair:
-very large hedgehog (probably a wig)
-fascinator thing with at least two ostrich plumes, a rhinestone brooch, and a black ribbon bow
Jewelry:
-Marie Antoinette mini portrait on a bow
-"MA" lady-in-waiting badge on a bow (inspired by contemporary Russian examples)
-large rhinestone earrings
-large rhinestone necklace worn at the neckline like an oversized brooch
-several rhinestone rings
-SO. MANY. RHINESTONES.
Makeup:
-either general deathly pallor, or pallor with early/minimal zombification rot
-light dirtiness from crawling out of the grave
-prosthetic appliance for the stitched-up decapitation
Of course I already have the Marie Antoinette portraits I made way back. I'm still tempted to redo older Marie, either with a different portrait entirely (why, oh why, did I not think to use her infamous chemise gown portrait???) or at least a better quality print. But that'll come down to last minute tweaks.
I also have little crown brooches to add to the centers of the bows, and I might add more ribbon too (the theme with almost everything on this project so far has been "when in doubt, add more"). All the jewelry really needs a post of its own, so more on that later.
And typically, everything else is a lot of mockups and prep and waiting right now.
Back in May I ordered 1780s stays from Historical Designs on Etsy.
![]() |
| © Historical Designs |
I can't properly start the dresses or petticoats until the stays are in hand, so in the meantime I've been focusing on accessories, starting with the bum pads and pockets. The cost for both was basically nothing, as I used old fiberfill and scrap fabric, which was awesome. I used Simplicity 8162 (the first American Duchess underpinnings pattern) for the bum pad, and Simplicity 3635 for the pockets. Both are fairly straightforward so there's not much to say or show, but I did make a few experiments and tweaks.
On the bum pads, I made the first one in the largest size thinking bigger is better - and it is, with caveats. I initially overstuffed it, and both it and I didn't look right while it was worn (very stumpy and stocky, which is already a problem for me being short, high-waisted, and curvy). So I made the second one in a smaller size and stuffed it more conservatively, then pulled some stuffing out of the larger pair and it too looked much better with less stuffing. The two sizes really only differ in how far they wrap around to the side and front of the hips: when viewed from the front, the larger size gives a little more width. As it turns out, having two sizes was perfect. My friend and I have the same hip measurement, but our proportions are different: she has wider hips, I have more butt. So with appropriate stuffing in each bum pad, the smaller size with volume concentrated in back was better for her, and the larger size with some extra volume on the sides worked better for me.
![]() |
| She won't sleep in her actual cat bed, but apparently bum pads are good enough for nap time. |
On the pockets, instead of using bias tape for the opening and outer edge, I did a facing on the opening (adapted from the Simplicity 4923 shirt) and just sewed a normal right-sides-together seam along the edge. There was honestly no reason for this except that I didn't have any bias tape and was too cheap/impatient to go out and buy some. I had plans to embroider Marie Antoinette's initials on the pockets, either by hand or machine, but that didn't pan out. I do want to make another pair someday, so I'll definitely try embroidery next time.
![]() |
| We're very mature costumers, clearly. |
With those base underpinnings done, I did eventually make a rough mockup of the dresses to get an idea of what my game plan was. I primarily used Fresh Frippery's awesome tutorial, as well as looking at the chemise gown American Duchess made from it too. The tutorial calls for three lengths of 55" fabric, or 165" total circumference, and I had ordered enough to account for that. But I'm playing with the idea of adding a black lining (for more dimension, and it gives a nice spookiness factor), and as American Duchess advises, 165" is very full to begin with and the thicker the fabric, the bulkier the dress. The lining I'm thinking about is the same fabric I used for the Lucille Sharpe nightgown, and luckily I had some yardage left over. So I made two mockups of 165", one with a lining panel sewn into the front and one of just voile.
The mockup with the lining wasn't terribly puffy, and maybe I could have gone with 165" and been fine, but after the bum pad puff debacle, I decided to cut down the fullness and scale it back to the 138" given for the chemise gown in Norah Waugh's The Cut of Women's Clothes: 1600-1930. I've seen lots of people make that version and they turn out perfectly suitably full. I tested the voile-and-lining mockup at 138" and liked it, so I cut the just-voile mockup down to 138" as well so they're both prepped for eventual construction. I ended up with something like this...
It's kind of strange - and honestly really great - how quickly during construction these dresses come together and actually look like what they are, even without the sleeves and finishing.
Even though I'm happy with the 138" circumference regardless, I'm still undecided on the lining. I'm not too worried historical accuracy, as these are zombie costumes, after all. I want things to look basically era-correct, but some artistic license is required. And they'll be torn and weathered, so there's also no need to consider HA for the sake of wearing these to reenactment-type events (I'll eventually make proper versions for that). I do really like the look of the black underneath, but it's just not at all actually necessary. The decision may ultimately just come down to time and money; there are still a few essential things to make and buy that take precedence.
Just yesterday I did a mockup of the shift using Simplicity 8579 (American Duchess's newest underpinnings pattern). Not really anything to show there, at least until I have the finished shifts done. I do need to decide if I'm going to do the HA French seams, or just say "eh" and leave them raw or finish them with overcasting or something. The pattern went together really well, and despite being worried that the pattern size I'd bought was too small, with the ease it ended up being almost a perfect fit (aside from bust, which stays will deal with; and upper arm, which I can adjust to be roomier).
I've also done one hair test. I'm not into the idea of HA pomatum and powder products right now (see a trend with this project?), so I researched and asked around for modern equivalents. I ended up using Murray's Superior Hair Dressing Pomade from a suggestion by American Duchess, and plain ol' all-purpose flour because it was the closest thing I already had in the house. I didn't really follow any one tutorial, as I used a lot of different sources and research, but the videos by The Dutch Milliners and historical portraits were especially helpful. I put the pomade in my hair while it was damp, then let it mostly dry before curling it very small sections with the smallest foam rollers I had. After setting overnight, I took the curlers out and let the hair relax. With more pomade on my hands, I broke the curls apart, then powdered everything - focusing on the roots - with sifted flour and a fluffy brush. I pinned the top into a sort of bouffant, then pinned the sides into place where I wanted them.
I think I need to use more pomade and a finer powder, and the sides need more teasing or rats for support. But I'm really pleased with it as a first attempt, and I think it'll be a good technique for more realistic historical costuming someday. Ultimately I don't think it's big enough for this project, though, which is all about excess and taking things to the extreme limit. So I'll probably be getting a wig (likely the Lioness wig everyone else seems to use to great effect) just to make it that much more extra.
In anticipation of building huge hedgehogs, I got a bunch of mesh bun donuts to cut into oblong rats to support and fill out the sides better.
![]() |
| One of the dumbest things I've bought for a costume ever. Thanks, Dollar Tree. |
Coming up next: SO. MANY. RHINESTONES.
Monday, April 24, 2017
Crimson Peak - NMP Nightgown & Robe Construction
More throwbacks.
I didn't take many photos of construction, partly because I covered the mock-ups so extensively but mostly because I was trying to work steadily and just rarely stopped to document stuff. This is pretty much it for the nightgown.
And of course, there's plenty to tweak on an inevitable Version 2.0. I ended up doing gathering instead of pleating around the neckline. Pleating would have been more accurate and a bit nicer looking, but I didn't want to take the time to do that. The gathering also affected the sleeve head more than I thought it would, so the armpits ended up a little tight and in theory should be opened up some. With the thinner fabric, the sleeves didn't have quite the fullness and drape I intended and that the mock-up had, so I'd change that. I also melted a hole in part of one sleeve, like a moron, so I kind of have to go back and tweak the sleeves someday anyway. I started on the ribbon ties at the front but after the first row I decided I wanted to do it differently, and it still needs lace, but that's a last minute handsewing bit.
As far as the robe goes, that was pretty much a quick no-photo job too, though I did take a few of stuff that didn't really go through the mock-up phase.
On the back panel, I cut out the sides and top with the pattern piece but left it the full 60" of the fabric, and all of that became the pleats. Despite the panel being so wide, the edges were still just strictly vertical, eliminating the pattern's flared hem. So I used the flared edge of the back pattern piece to make an additional triangular gusset of sorts which was stitched in as a side panel, restoring the flare. I draped the pleats on the dressform, kind of by eye and with a little measuring. I ironed them well from the neckline to about the waist, and then lightly pressed less pronounced pleats for a few inches below that so the pleats flowed somewhat more naturally into the unpleated lower section. I also did some quick and dirty handstitching along each pleat (mostly inside, but a little outside) to hold the pleats down at the upper back where they needed to be the most defined and stay immobile.
I bound the sleeves and robe front with the same fabric to create a trim and finish off the edges. It's a lot of placing and folding and flipping over, basically like this, if anyone is interested and can decipher my terrible reference photos:
And with everything sewn, it was pretty much here.
I didn't get any photos of the dyeing process because it was messy and kind of nightmarish, but I did think to take this photo the night before the convention. It ended up being the process and colors/materials I planned on, but it also ended up being a mistake, so someday I'll wash it out and redo with something like Dye-Na-Flow or fabric paint (sacrificing a little on color accuracy for the sake of ease).
I didn't get any of the vest in-progress either because that was a quick rush job a few days before we were wearing them, but I'll hopefully be documenting the second vest and white ghost vest.
I did some light styling on the wig the day before, just some soft fingerwaves around the face, but they ended up kind of ineffective and disappeared.
And a few months ago I made a cleaver to carry around. I started with a funky Halloween prop I got at KMart, and as usual I didn't document much of the mod process. But I basically used a Dremel to alter the cleaver's shape and smooth the surface (and added a hole in the handle to attach a ribbon for easy carrying), then resealed it with Plasti-Dip. In a strange turn of events, it was really fortuitous that red Plasti was all I had, because it's a gruesomely good color and texture match for the red ghosts. It was kind of disappointing to paint over it. Then I used alternating layers of sandable primer and Bondo to fill in the weird chips and grooves, sprayed it black as a base, did washes of acrylic for the final colors, and sealed it with a matte fixative. For being matte it still turned out kind of shiny, so I might go back and stipple on some more light paint to dull it down some.
I ended up skipping it for the convention, just to avoid the added hassle of going through weapons check, but I'll be using it whenever we do a proper photoshoot.
Next time: Finished!
I didn't take many photos of construction, partly because I covered the mock-ups so extensively but mostly because I was trying to work steadily and just rarely stopped to document stuff. This is pretty much it for the nightgown.
And of course, there's plenty to tweak on an inevitable Version 2.0. I ended up doing gathering instead of pleating around the neckline. Pleating would have been more accurate and a bit nicer looking, but I didn't want to take the time to do that. The gathering also affected the sleeve head more than I thought it would, so the armpits ended up a little tight and in theory should be opened up some. With the thinner fabric, the sleeves didn't have quite the fullness and drape I intended and that the mock-up had, so I'd change that. I also melted a hole in part of one sleeve, like a moron, so I kind of have to go back and tweak the sleeves someday anyway. I started on the ribbon ties at the front but after the first row I decided I wanted to do it differently, and it still needs lace, but that's a last minute handsewing bit.
As far as the robe goes, that was pretty much a quick no-photo job too, though I did take a few of stuff that didn't really go through the mock-up phase.
On the back panel, I cut out the sides and top with the pattern piece but left it the full 60" of the fabric, and all of that became the pleats. Despite the panel being so wide, the edges were still just strictly vertical, eliminating the pattern's flared hem. So I used the flared edge of the back pattern piece to make an additional triangular gusset of sorts which was stitched in as a side panel, restoring the flare. I draped the pleats on the dressform, kind of by eye and with a little measuring. I ironed them well from the neckline to about the waist, and then lightly pressed less pronounced pleats for a few inches below that so the pleats flowed somewhat more naturally into the unpleated lower section. I also did some quick and dirty handstitching along each pleat (mostly inside, but a little outside) to hold the pleats down at the upper back where they needed to be the most defined and stay immobile.
I bound the sleeves and robe front with the same fabric to create a trim and finish off the edges. It's a lot of placing and folding and flipping over, basically like this, if anyone is interested and can decipher my terrible reference photos:
And with everything sewn, it was pretty much here.
I didn't get any photos of the dyeing process because it was messy and kind of nightmarish, but I did think to take this photo the night before the convention. It ended up being the process and colors/materials I planned on, but it also ended up being a mistake, so someday I'll wash it out and redo with something like Dye-Na-Flow or fabric paint (sacrificing a little on color accuracy for the sake of ease).
I didn't get any of the vest in-progress either because that was a quick rush job a few days before we were wearing them, but I'll hopefully be documenting the second vest and white ghost vest.
I did some light styling on the wig the day before, just some soft fingerwaves around the face, but they ended up kind of ineffective and disappeared.
And a few months ago I made a cleaver to carry around. I started with a funky Halloween prop I got at KMart, and as usual I didn't document much of the mod process. But I basically used a Dremel to alter the cleaver's shape and smooth the surface (and added a hole in the handle to attach a ribbon for easy carrying), then resealed it with Plasti-Dip. In a strange turn of events, it was really fortuitous that red Plasti was all I had, because it's a gruesomely good color and texture match for the red ghosts. It was kind of disappointing to paint over it. Then I used alternating layers of sandable primer and Bondo to fill in the weird chips and grooves, sprayed it black as a base, did washes of acrylic for the final colors, and sealed it with a matte fixative. For being matte it still turned out kind of shiny, so I might go back and stipple on some more light paint to dull it down some.
I ended up skipping it for the convention, just to avoid the added hassle of going through weapons check, but I'll be using it whenever we do a proper photoshoot.
Next time: Finished!
Subscribe to:
Posts (Atom)