Current Projects

Sunday, December 30, 2018

2018 Recap + 2019 Plans

2018 was a weird year in a lot of ways. It felt like it lasted forever, but now looking back at the end of it, where did it go??? Lots of bad stuff, but also some great stuff, and I still managed to get a fair bit done.

February brought two new events.  We went to The Revolution in Huntington Beach in "civvies" (non-costume), but it was an awesome event and we're definitely going back in costume next year (more on that below).


We also finally made it to the Great L.A. Air Raid, which was incredible.
We arrived a little later and left a little earlier than I maybe would have liked, but it was a great toe in the water for the first time attending. As I try to get into the historical costume and reenacting scene a bit more, both of these events are definitely going to be annual staples.

In April we went back to WonderCon, this year as Beetlejuice and Lydia the first day and TWS Mall Cap and Nat the second.
I added pockets to Lydia, which was great in principle, but having pockets in a lose-fitting tube dress means a bunch of weight hanging off the shoulders and neck. With my chronic neck problems that ended up being a major issue. I also decided to skip contacts but was still too committed to accuracy to wear my glasses, so strained eyes didn't help with the overall discomfort. I ended the day with a migraine and it kind of ruined the experience. Lesson learned for next time: carry a bag or wear 18th century pockets under the dress, and wear contacts. I also realized that despite putting on what appears to be fairly heavy makeup, it just disappears in photos, so I'm considering trying some heavier more glam Lydia makeup in future. Otherwise, it was still pretty fun, and seeing people's reactions was nice, especially this being our first time wearing them at a con.

Cap was much better, as always. I repainted the soles of the shoes with spray paint to hold up a little better, and added the brushed metal texture to the shield.
One of our photographer friends was there so we were going to try to get some nice photos, but it didn't pan out so that's still on the "someday" list.

In May, I dyed my Captain America: Civil War Sharon vest.
I still want to try to get the truly screen-accurate vest in the black/grey, but the blue one definitely looks better having been dyed. It needs another coat, but it's progress.

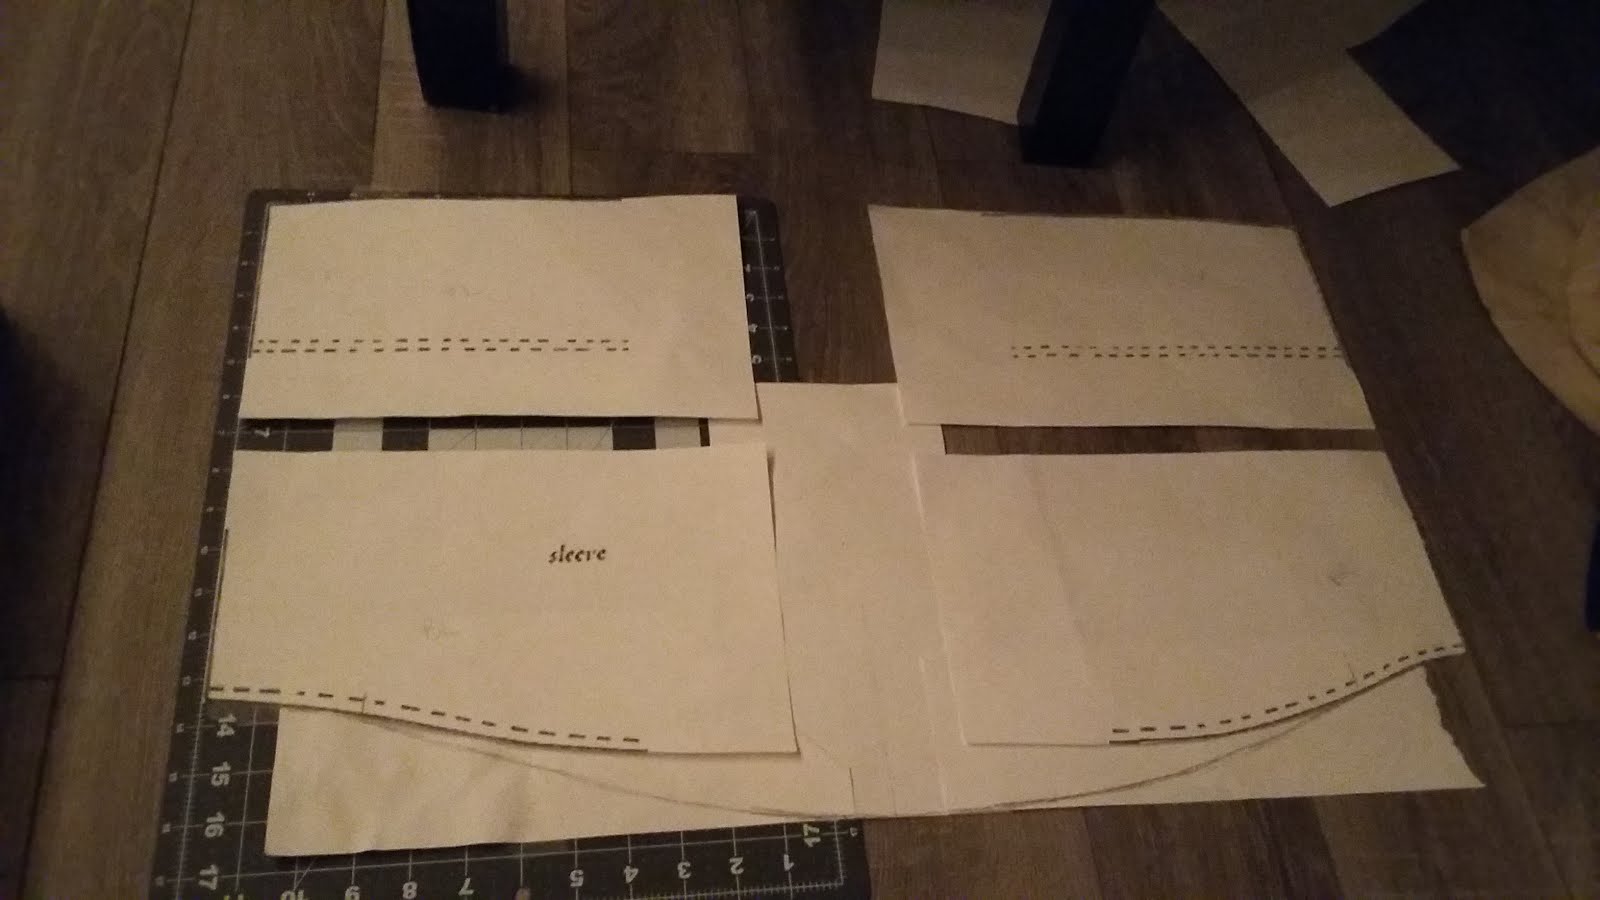
We made a little progress on our Reserve TIE Pilots over the summer. We got our belt buckles sanded down and brushed, but didn't think to glue on the greeblies and seal it immediately, so we ended up with some rust and now have to do it all over again. I also finally got the templates for our jumpsuit modifications.

I tore an inconvenient place (the butt) on my TWS Mall Cap pants over the summer, which is definitely not progress but it was an event, so now I have to replace those.

August was huge just for Labyrinth Masquerade, and was my biggest project completion with French Revolution Zombaes.


The costumes were fantastic, but most happily, we met up with some Instagram costume friends who are now Real Life friends.

In September, I started some Hocus Pocus stuff. So far it's the spellbook and getting fabric swatches, both of which are almost done.

In October, we went to L.A. Comic Con for the first time and wore Ghost!Thomas and Lucille again. Though the costumes were wear-ready, we did make a few substantial upgrades. Ghost!Thomas got new shoes, which my friend painted and look amazing.
I redyed Lucille's robe with a customized Dye-Na-Flow blend. It's still not quite what I want, but a definite improvement over the original dye job.
I also changed the wig. The first wig I had ordered years ago didn't fit me well. The hairline at the temple came way too far forward and completely covered my ears, and there was a weirdly pronounced peak above each temple. At the time I didn't want to deal with it, so I ordered a different style which is what I wore with the costume last year. It worked okay at WonderCon while it was in a braid, but with the hair worn down at Labyrinth it kept wanting to slide off. More experimenting after made me realize it was actually too small, and eventually it got to a point where I couldn't stand wearing it anymore. When we decided to bust the costumes out again for L.A. Comic Con, I didn't have the money to drop on a new lace front, so I got the original back out and tried to make it work. And it actually worked well. I changed the hairline and cut back the lace so it actually fit my ears and looked more natural, and it was so much more comfortable. This was also my first time actually securing the lace with spirit gum. I didn't quite get it pulled over my hairline at the sides (which just says to me I need a still bigger wig), but it looked really nice along the forehead.

We met up again with our friends from Labyrinth, who were Nightgown!Edith and Suit!Thomas, and we got lots of great reactions.
Being in a Crimson Peak group definitely helped with visibility, and the con being right before Halloween and kind of unofficially spooky themed definitely didn't hurt either. It was a completely different experience than WonderCon last year, where we had only a handful of people react and half of those thought my friend was Sweeney Todd and ignored me. We also finally got some nice and varied photos of these costumes, courtesy of our friends.

Wearing all that fabric and a heavy wig all day was too much for my neck though, especially with a flare up having already started the week before, so the week after was fairly miserable and I'm pretty sure that contributed to the solid month of migraines and tension headaches I had in November. So unfortunately, Murder Party Lucille might be relegated to just photoshoots from now on. (More excuse to start thinking about her black velvet park/ghost dress though.)

October was pretty busy, and the day after LACC we did a Hocus Pocus photoshoot at Sunnyside Cemetery as Jay and Ice.
Mostly this was just putting together the costume from purchased pieces, but I also cut and restyled my blonde lace front wig, which coincidentally made it more aesthetic and practical for Cap and more accurate for Civil War Sharon.

In November I finally finished my King George crown, which even with my reputation for unfinished projects probably now holds the record for longest continuous construction time of a single item. But hey, I did finish it.
I just did a recap on this sucker and also what comes next.

So the 2018 breakdown was:
  • 1940s ensembles: completed
  • Lydia Deetz: pockets added, wig restyled
  • TWS Mall Cap: shoe soles repainted, shield modified, wig restyled
  • CW Berlin Sharon: vest dyed, wig restyled
  • Reserve TIE Pilots: buckle construction started, jumpsuit templates acquired
  • French Revolution Zombaes: completed
  • Lucille Nightgown/Robe: new wig, robe redyed, new photos
  • Jay and Ice: completed, new photos
  • Sanderson Spellbook: almost completed
  • King George crown: completed
  • King George cape: pattern acquired
And December has mainly seen the start of some planning...

2018 was supposed to be the year of finishing the unfinished, and it kind of was, but mostly it wasn't. I did revive and revamp Hocus Pocus, but that's very much ongoing and likely won't be done in 2019 (still foolishly aiming for Labyrinth, though). We did a little work on our Reserve TIE Pilots, but not proactively, so those are still on the docket. King George's crown is done, but the other accessories are still an ongoing go. Civil War Sharon is that much closer to done, though Nat isn't, but they're also still really close in general, so hopefully that'll happen. In other ongoing work, we're hoping to finalize concept and design work on Gibson Gothic and Sword-and-Sandal Superheroes, and maybe Lost-Hope Ball too.

There are also some more pending upgrades. We want to upgrade our TWS Cap and Winter Soldier costumes, which we wore just once at an underwhelming SDCC a few years ago and then threw in the closet. I already have a new jacket for Cap, and have my nice shield as well, so this will probably mostly be redoing the Winter Soldier jacket. Our historical events, namely The Revolution and Great L.A. Air Raid, also need modified ensembles.

As far as totally new, we really want to do the TWS Cap Stealth suit and an amalgam MCU Black Widow suit. This is definitely not an outright 2019 goal. Given the scope, it'll be slower progress depending heavily on patterning and workouts (I am determined to be a Dorito). And after seeing Bohemian Rhapsody, we're desperate to do Freddie's party outfit with the crown and a Bowie to go with.

So the rough plan for 2019 is:
  • Winifred Sanderson, Mary Sanderson, and Billy Butcherson (Hocus Pocus)
  • Reserve TIE Pilots (Star Wars)
  • King George III accessories (Hamilton: An American Musical)
  • CW Berlin Sharon and Nat (Captain America: Civil War)
  • Gibson Gothic and/or Sword-and-Sandal Superheroes and/or Lost-Hope Ball designs (historical/original)
  • TWS Cap and Winter Soldier (Captain America: The Winter Soldier)
  • Cap Stealth Suit and Black Widow Tactical Suit (Captain America: The Winter Soldier and MCU)
  • Freddie Mercury party outfit (Bohemian Rhapsody) and David Bowie
  • c. 1783 American Revolution middle-to-upper class ensembles
  • new 1940s ensembles
We'll see what happens. Happy New Year, everyone!

Wednesday, December 19, 2018

Hamilton - King George: Moving Forward

Now that the crown is (finally) done, at least in Version 1.0, as well as the livery collar, star badge, and rhinestone garter, I can start getting back to the big picture plan and thinking about what's next.

Star badge:
I technically have one done, and it's alright. But I've never been totally satisfied with it (I will never be satisfiiiiiied). The show has since premiered on the West End, so I've been able to see the costuming tweaks they made for that new production. Most notably (and relevantly), they gave George an actual metal and rhinestone badge more like the real Order of the Garter rather than the embroidered one from the shows in the U.S. Either way works since both are accurate, and I'm not fussy about mixing costume variations from different shows. At the very least I could just remake the embroidered version. But I just love the way the rhinestone badge looks (*sparkles*). From seeing other people make replica royal orders and orders of chivalry and such, I have half an idea of how to make a star badge like this out of other jewelry pieces. It's an option, and it would probably be another cheap and fairly easy accessory. Time will tell.

Scepter:
I decided I had to have one after seeing the show last September, but I forced myself to put it off until all the other pieces I was working on were done. Now the time has come. I haven't really started planning construction yet. It'll probably be some kind of dowel as a base, and then I'll make the top piece similar to how I made the top of the crown. I need to do more research on it to get good references, so that'll be the first step.

Cape:
While the cape falls in the realm of clothing more than accessories and the costume can be complete without it, it's still a priority over the suit. I think I can wear it and the accessories over something silly and dumb like a red union suit or ironic t-shirt and Union Jack boxers or something as kind of a high-quality gag costume, so that I can still enjoy what I've made so far without waiting on the whole suit. By chance, I was at a thrift store in October and found a costume cape with the perfect shoulder shape. So after months of struggling with picking patterns and doing alterations (more on that later), I can actually start making some real progress on this part. I have some of the materials, though now that the pattern is different I might need to order a little more yardage (fingers crossed that it goes the other way and I'll end up with extra instead), and I still need to buy some of the ribbon trim. But overall, the mockup is ready to start at least.

This monster is still going to move forward casually and at a slow and hopefully somewhat steady pace, but it's going to be a busy few weeks around the holidays and then suddenly school starts again in January. Fingers crossed!

Thursday, November 8, 2018

Hamilton - King George Crown: Finished! (?)

It's been two years in the making, but this dumb sucker is finally finished.


I promised an unveiling, so how about an unwrapping?

This paint is no joke.
My fears about the texture from the primer were substantiated, and a lot of the surface is kind of grainy so then the chrome finish didn't turn out as well as it could have. But the top piece was the cleanest and painted the best. This is just three light coats of the Montana gold chrome on plastic and I can hardly even believe it.

And tada!
Kind of hate how dull and flat everything - even the velvet - looks here, but okay.
Up until the literal moment that I tore the plastic bags off, I was really underwhelmed. After the paint, I felt "eh" partly because of the inconsistent application, but also for reasons I couldn't really pin down. After I pulled the puffy paint mask off the rhinestones and saw those with the paint, I still felt mostly "eh." Maybe it was having been working on it and looking at it in just bits and pieces for so long, maybe it was losing perspective. Don't know. Then when I pulled the bags off and got to see the paint and the rhinestones with the velvet and fur, it suddenly clicked and I fell in love.


I still want to make an improved Version 2.0. That impulse hasn't changed at all. I'd never made anything like this before, and when I started I really wasn't sure how I was going to actually do it and if it would even work. I improvised a lot during the process, learned a whole lot too, and now there's a lot I know how to do better or differently altogether. Just for another challenge, and to be that much more extra accurate, I kind of want to do one in metal. Given how heavy this one is already, one made of metal would probably be for photos and display only, not wearing out to events anywhere. But it would still be pretty fabulous.

But at the very least, I will be making another one with pretty much the same exact materials and overall process. Most stuff I had to buy in more quantity than I needed, so I would only have to reorder a few little things. I can scale the pattern down a little to fit continuously on the 24" length of the plastic sign, so it doesn't need an extension piece and will fit the base hat and my head and frame a bit better. I can also be smarter with painting: get the good sandable primer again, then go straight to black base and the well-proven Montana gold chrome, and glue the rhinestones on last.

Having this done and feeling good enough about the whole process that I'm willing to make a duplicate has also given me the confidence to make another crown of very similar design for a costume that made its way onto my list quite unexpectedly last week, so that'll happen someday too.

In the meantime, with this out of the way, I'm getting back into what's next on this incredibly long haul project. Stay tuned!

Hamilton - King George Crown Part VI

George is still kicking, I promise. And we're in the home stretch.

Last I worked on the crown, I had tried using the DecoColor Premium gold paint pen and the whole thing failed kind of epically. Having an airbrush or being a better painter would have made a difference, but as is it just wasn't happening.

So I had sanded it down as much as possible to get ready for another attempt with something else, and I was considering gold leaf versus spray paint. I was initially leaning towards gold leaf purely for the amazing finish it can give, but I've been hesitant because I kind of doubt my ability to get that kind of finish, especially using it for the first time and using it on an item like this with so many small, fussy areas (rather than more open areas that would be easier to access and burnish). I was recently reintroduced to Montana spray paint, specifically the gold chrome which I saw someone use on an Iron Man helmet to great effect. When it goes to plan, it seems to have as close to the color and finish I want that I'll probably be able to get with a spray paint. So I decided to track that down.
This is the sixth gold paint in general (and fourth spray paint) I've bought for this project, so I'm really hoping I can use it effectively enough and it can give me something I'm happy enough with. (I've also seen some good results with Rustoleum Specialty Metallic, so that's a possibility too if I really have to.)

Going back to a spray, I also had to test some methods of masking the rhinestones. My criteria was that it had to be something I already had, and would both mask the rhinestone enough to block the paint but also remove cleanly without sticking to the stones or fouling the paint finish. I asked around in some crafting communities and got a lot of good suggestions, ultimately narrowing it down to Vaseline, liquid latex, mustard, and toothpaste. From my own ideas I added Tacky Glue and puffy paint, and did tape too as backup. I did a test piece using the 3mm rhinestones (being the smallest and most fiddly, I figured anything that works on those will work on anything larger).
Birthstones for crafters.
Everything masked the paint well, so the decision really came down to cleanup. The Vaseline and toothpaste smeared too much, both seeping into the stone setting and getting on the paint. The mustard was a little better, but still too messy. The tape didn't want to stick, so that had too much risk of falling off mid-painting. The Tacky Glue stuck too much and was hard to remove. So the best contenders were latex and puffy paint. The puffy paint peeled off a little cleaner and was easier to apply in the first place (small nozzle tip on the bottle, and thicker so didn't run and didn't need layering) so I chose that.

In the meantime I cleaned up the stones to make sure all the little gold smudges from my messy paint pen application are gone. I might have to do a little touch-up after spray painting too, depending on how effect the masking ends up, but the less clean up I have to do around the finished paint job, the better. The masking went pretty quickly, and I decided to mask all the large stones too instead of doing those with tape.

I changed the plan up a little and decided to add the fur trim before painting. I initially wanted to save that for last so I wouldn't have to cover the fur up for painting, but I realized that gluing the trim on might require more direct handling than I want to put the finished paint through (being an unsealed chrome, it's going to be hard enough to keep fingerprints off it anyway). I also scrapped the original plan of cutting out small circles of black faux fur and gluing that into the white for the ermine spots. I did try it, but it was too messy and clunky. So I just colored in the spots with a marker like I should have thought of in the first place.


I ran out of sandable primer the first time I prepped this thing for paint, and I ended up getting a different brand this time which I'm regretting a little. It sanded fine, but left a bit of a texture rather than the extremely smooth finish the other stuff had. Lesson learned, and hopefully it doesn't impact the paint job too much.
I went over that with the usual black paint+primer.
Then the moment of truth and I sprayed the gold.

Stay tuned for the unveiling!

Saturday, November 3, 2018

Hocus Pocus - Back From the Dead (AKA Version 2.0)

I've been obsessed with Hocus Pocus since it first came out (25 years ago!) and I've always wanted to do the costumes. We did somewhat slapdash versions of Mary and Sarah Sanderson for Mickey's Not-So-Scary Halloween Party at Disneyland a few years ago, and they served their purpose and actually went over pretty well considering the rushed effort, but I was underwhelmed with my attempt. I've been wanting to revisit/revamp/redo the project and do it properly ever since, but the timing was never quite right.
Until now.

We decided that it was time, and we're tentatively aiming to bring the witches back for Labyrinth Masquerade 2019 (can you imagine a better place?). Because we're committing to do things properly and with as much attention to detail as possible, but still on a budget as always, we're not locking ourselves into that deadline. We're just planning to work on them as steadily (and calmly!) as possible - if they're done by then, fantastic; if not, that's okay too and we'll finish whenever we finish.

Even though it doesn't really matter, it's a little hard doing these costumes with only two people. But there are ways around it. In thinking about them we've tried to do combinations that make a bit more sense. Mary and Sarah work a little better maybe than Winifred and one of the others, and we've also considered the option of making a "Hast thou seen this witch?" sign for whichever sister we're missing. Winifred and Billy, or Sarah and Billy, work great as a pair too.

During our first attempt, my friend was Mary and I defaulted to Sarah because another friend was going to be our Winifred. That fell through, but by then it was too late to change my own costume. I wasn't comfortable wearing Sarah for a lot of reasons, so rather than just make her again, I decided to go for Winifred like I wanted to in the first place.  I'll be upgrading my friend's Mary as a backup, and just on principle at this point, but pending SFX makeup our plan A is to make her a Billy Butcherson. We were all set on just going as a duo again, but we had the great fortune to meet an Instagram costuming friend at Labyrinth this year. We broached our costume idea with her and asked if she wanted to be our Sarah, and we were so pleased that she said yes! So as it stands, we'll have all three sisters or Winifred-Billy-Sarah which also works great (we're already planning some girlfriend-boyfriend-other woman meme photos).

That's a big ol' text wall, so have some photos of the meager progress I've made so far.

Technically the first thing I started on was Winnie's spellbook. Here's a little tease:

It's almost done, so I'll save all that for its own post.

In the meantime I also made Winifred's necklace, kind of on a whim. I'd done some searching to see if there was anything already available, and I couldn't find much readymade. I have a ton of random jewelry and craft supplies, so I got out some wire and beads and tools and sat down one day to see if I could make the thing myself. Turns out I could. No progress photos, because I kept improvising stuff until suddenly I had a finished necklace.

This was 100% a zero-cost stash-busting project. The wires for the circular pendant thing were a thin gauge from my ongoing King George III and a thicker gauge salvaged from an old notebook. The stone in the center of it was lifted from a pair of earrings I haven't worn in ages. The black beads are from an old jewelry-making bundle I bought probably 15 years ago, and they're strung with yet another King George wire. The little spirals were the same wire shaped around a paintbrush. The jump rings are also leftovers from King George. The small bit of chain in the back and the lobster clasps are extras from the Pirates of the Caribbean medallions I made a while ago (and never posted?). My friend sculpted the little scarab bead, and I painted it with some greens and yellows. The spirals were painted with a mix of red and brown (I might go over it with a glossy paint), and all the other wire was painted with gold. I love the result, and for being completely free and less than a day's work I love it even more.

I really like doing prop and jewelry work like this, especially as a break from the yards and yards of fabric I'm usually dealing with. I figure getting some small, cheap, easy costume pieces like this out of the way is also a smart way to go about things on a project like this.

I can't say when I'll be making more definitive progress. I've been steadily ordering swatches, but I'm saving that up until everything's in hand and decided on, so it might be a while. I was hoping to have the spellbook done by Halloween just for kicks, but progress on the last few steps has been slow. So no deadline, but I'll post on that soon. Otherwise right now it's a lot of research and construction planning.

Stay tuned!

Saturday, October 27, 2018

French Revolution Zombaes - Finished!

As per usual, I fell behind on documenting progress while I was busy making it. To make some attempt at recap...

The only photo of the dress construction I have is the sleeve pattern, which was scaled up from the Norah Waugh pattern.

Figuring out patterning and construction on my own was a challenge, and frustrating at times. I'm fairly experienced with sewing, but I still prefer established patterns and instructions that I can modify as needed but have a foundation to refer back to. But it was a really good learning experience, even if I didn't always love it, and it came together wonderfully in the end.

I also made petticoats, roughly following American Duchess's old tutorial. So. Much. Pleating. But it was fun once I figured out the spacing.


We got our stays in plenty of time, and they were incredible! I did a fit/wear test right away and loved it.

As far as finishing a single piece, the wigs were probably the quickest part of the whole costume. I started with the Boogie Babe wig, which turned out to be a great cheap alternative to the Lioness wig so many people use (though I still want to get my hands on one of those someday).


There wasn't much organized method to it. I just separated and broke up the curls, and teased as I trimmed, using historical portraits as reference. I left the lower back at the base of the neck long and straightened then recurled the hair into about six sausage curls. Once styled, the wigs were sprayed with silver and then white hairspray from a party store. Since we were blending our real hair into the wig to hide the hairline, we needed something heavy to help cover and blend the different real versus fake hair colors. The silver was more opaque, so it did a pretty good job of this (though we didn't spray quite enough on our own hair the night of), but it was very silver. The white over the top helped hide it and soften everything, but some still showed through. It didn't wreck the look, and it worked okay with the ghostliness and the silver jewelry, but it wasn't what I intended. The white on its own looked great and actually replicated the look of powder really well, so that's something I'll be doing on other 18th century wigs in the future.


I don't really have any photos of them, but the "mitts" were $1 knee-high stockings bought just a day or two before the event. Everything else struck out, and they were a lifesaver. I literally just cut finger holes, and the tears and runs that developed just added to the creepy ghost/zombie theme.

And that's pretty much it!
With our awesome new friend, Lady Toxie.


A lot of stuff came down to the wire, we got a later start than we intended, and we went down to the party a few hours late. But it got done and we wore it and it was awesome! For being such an elaborate and fussy looking finished product, they're ridiculously comfortable. Even in the the short time we were there, a lot of people loved our costumes, and a surprising number actually got the whole theme. Seeing their eyes go wide with recognition was really gratifying. We got a lot of compliments on the wigs, too, which was great. We're definitely busting these out again. On these in particular, we're going to work on distressing them and making them more zombified (they were more ghoulish/ghostly this time, which actually worked well as its own thing, too). I'm also going to eventually make another set of chemise dresses with the same design and a bit more accuracy to wear to reenactment events.

I'm already on to the next project (big things afoot), so more on that soon!

Sunday, October 21, 2018

French Revolution Zombaes - BLING Part II

The saga continues...

Marie Antoinette mini portraits
I still haven't replaced older Marie's portrait. But I did make other changes to both portraits. To drive home the fact that it's Marie Antoinette and give a more obvious visual connection to royalty, I got some little crown brooches to add on. This was also inspired by royal family orders, which feature a crown above a portrait of the royal/monarch on a ribbon. Beauty From Ashes has great information and tutorials on royal family orders.

I looked for a simple design that was similar to the portrait settings, and it had to have rhinestones of course.
I didn't think to take a photo before doing modifications, so here's the seller's photo. Found here.
Then I lightly repainted them with silver acrylic to tone down the shine and match them to the settings. Luckily, having pin backs already they were really easy to attach, and I can even remove/replace them as desired.

I also added more ribbon, black organza this time, with a bow on the bottom of the setting and a single length across the satin ribbon bows.


"MA" lady-in-waiting badges
These have a place in 18th century history, but not necessarily in France, so they kind of straddle the line of accuracy and artistic license. I based them off the "badges" worn by ladies-in-waiting to female royalty, featuring the woman's jeweled initials on a ribbon bow. The era-appropriate examples I could find were all Russian, but at various times they were used in other countries as well. They have a fun history, and again, Beauty From Ashes talks about them some here in connection to other royal orders. I figured that since France had a cultural influence on Russia, and Russia and Austria had some political connection, and Marie Antoinette was Austrian... well, this wouldn't be too much of a stretch to say it's historically plausible, especially in an unofficial capacity, even if it didn't actually happen.

I got some appropriately swirly and Rococo-ish - and, of course, sparkly - letter brooches in "M" and "A" for the queen's initials.
Seller's photos. Found here.

I also got some more crowns for these, since the badges almost always have them.

I followed Beauty From Ashes's royal order sash tutorial for the bows, making some changes to allow for a better fit on the shoulder. The first layer is a 4" wide loop, the middle layer is a 3.5" loop, and the top is a single layer 3" wide with pinked edges. They turned out a little messy because I was making them quickly last minute, so I'll be going back and redoing them at some point, but they turned out well enough for the night.

Hair doodads
I knew I wanted feathers in the hair almost from the start, and the rest of the ribbons and such to go with it kind of happened as the entire costume got more elaborate. Two ostrich feathers was kind of the benchmark, and initially I was going to do one each of white and black. But I didn't like the asymmetry. So the plan evolved a few times and we ended up with two black and one white.

The "brooch" is the center of the necklaces that I removed when I was modifying them (having swapped them with the actual brooches that I had originally ordered for the hair).  I used strips of the same black fabric from the lady-in-waiting badges to tie everything together.


Sash "Buckle"
Modifying the necklaces left me with four center pieces, and after doing the hair doodads I still had two pieces left. There was really no need to add them to the costume, but at that point I figured I might as well just on principle. The more ostentatious sparkle the better. The only place left to put anything really was on the waist sash, and as luck would have it the necklace pieces were exactly the same length as the ribbon width (3"). I added a pin back to the top and that was that.

Fans
This project was continually evolving, and this whole new detail was thought up just within the last few weeks. I really came to it by thinking of ways to accentuate the French theme, as well as the zombie theme, so I looked up "brains" in French and fell down the rabbit hole.
They might be undead, but they've still got manners.
I needed something for that to be written on, and fans were the most obvious solution. They're a better and more convenient accessory than a sign or something would be, and have the added benefit of being practical.

The fans themselves are the very basic bamboo slat and fabric variety. We went through a ton of handwritten and calligraphy fonts and picked some that were the most suitable for historical context and/or kind of rough. I painted the slats and fabric edge silver, and my friend did all the Photoshop whatnot and painted the text on.


They hang from the waist by a length of black organza ribbon, tied to the waist sash.

Next, the finish line!

Wednesday, August 15, 2018

French Revolution Zombaes - BLING Part I

As promised, a recap of all the many, many rhinestones involved in this project. And there are many. So I'll break it up into two chunks: first the more straightforward jewelry, and later the ribbons/bows/extras.


Rings
I'd been searching for a bunch of gaudy cocktail rings that both looked correct and were affordable, but style and price and quantity never worked out, so I decided to just make them. It ended up being fantastically cheap that way, too. The first set I made with ring blanks I already had, plus 3mm and 4mm rhinestones (fortuitously left over from King George's crown).

The second and third sets were "designed" (and I use that term that loosely) based on Georgian jewelry and the rhinestone sizes I had. The blanks were chosen based on size accommodation and interesting detail: the prongs on the side are reminiscent of a crown and a little more ornate, and I knew I'd be able to bend them out of the way if I needed more space for the rhinestones.
18x25mm. Seller photo. Found here.
18mm. Seller photo. Found here.
One is 18mm with a single matching stone, just to look oversized and ridiculous; and the other is 18x25mm using a single 13x18mm stone surrounded by some 4mm stones, which is equally oversized and ridiculous but also imitates a stone layout fairly common on 18th century rings.


Earrings and Necklace/Brooch/Whatevers
Aside from the mini portraits I already had, earrings were the first jewelry piece I was completely decided on using. I came close to buying some really good options, but then found a necklace/earring set that looked really promising. Even though I'd scrapped the idea of a necklace in the traditional sense (too much interference with neck wound makeup), I figured I could pin the necklace to the dress like a weird brooch thing.
Fig. 1. Weird brooch thing. Found here.
They were a little funky in person and needed some work, so I initially just added more rhinestones and repainted everything darker - with DecoArt Dazzling Metallics in Shimmering Silver as a primer, topped with Jacquard Lumiere in Pewter sort of lightly drybrushed on.  On the necklace, I also removed the chains and the round rhinestone links on the sides.
Don't know why I didn't photograph the earrings, too. ¯\_(ツ)_/¯
That itself was a big improvement. But then I decided they weren't large/obnoxious enough. So I ended up ordering two more necklace/earring sets to harvest for parts, which were modified with rhinestones and paint the same way.

For the earrings, I took the posts off both pairs and the teardrop rhinestones off one pair (and set the extra teardrops aside for the necklace mod later). The piece without teardrops was turned upside-down and connected to the piece with the teardrop, and then the posts were reattached at the new top.
Earrings on the left are brand new before any mods at all, and right is the result of the second round of mods.
The necklaces... I don't even know what to call these, really. They sit where a brooch would, but they're shaped more like a necklace, and they're actually built from both. Who knows? But I love them.

Each one ended up being Frankensteined from parts of two original necklaces, the extra teardrops from the earrings, and a separate brooch. I had already ordered some brooches in a similar design to go in the hair with a bow and some ostrich feathers.
Seller photo. Found here.
When they arrived, I realized they were a little large and heavy for the hair, and I liked them better on the dress. So I decided to remove the centers of the necklaces, replace them with the brooches, and then use the necklace centers for the hair instead (more on that later).

The brooches got the same paint and rhinestone treatment.
Left is repaint only, right is repainted and added rhinestones.
On the necklaces I removed the round side rhinestones and chains again like before, and disconnected the centers...
...and removed the teardrop rhinestones from them, keeping the teardrops and setting the rest aside (for hair doodads later). I used the extra connector rings to attach the remaining necklace pieces to each other and the brooch. The teardrop rhinestones from the center necklace pieces and leftover from the earrings were clipped onto the necklace at strategic points to match the teardrop on the brooch.
There were a few minor tweaks after this, and ribbons are still up for debate, but this is pretty much before and after.
TLDR: each pair of earrings is built from two pairs, and each necklace is built from two necklaces and earring remnants and a brooch (so 4 necklace/earring sets + 2 brooches = 2 finished sets), and everything was repainted and further bedazzled.

It still wasn't quite fussy enough, so I've been playing around with some little bows of black organza ribbon. I'm still not sure about them, but if I use them, I'll add three to each side, essentially between what was originally each separate chunk.
And that's pretty much it!


Stay tuned for Part II!

UPDATE: On the night of the event, with everything on we decided the necklaces as brooch collar things didn't quite work how we wanted. Weirdly, it made them less ostentatious somehow. So with some extra black organza ribbon, I turned them back into necklaces. Wacky hijinks!