Current Projects

Wednesday, August 15, 2018

French Revolution Zombaes - BLING Part I

As promised, a recap of all the many, many rhinestones involved in this project. And there are many. So I'll break it up into two chunks: first the more straightforward jewelry, and later the ribbons/bows/extras.


Rings
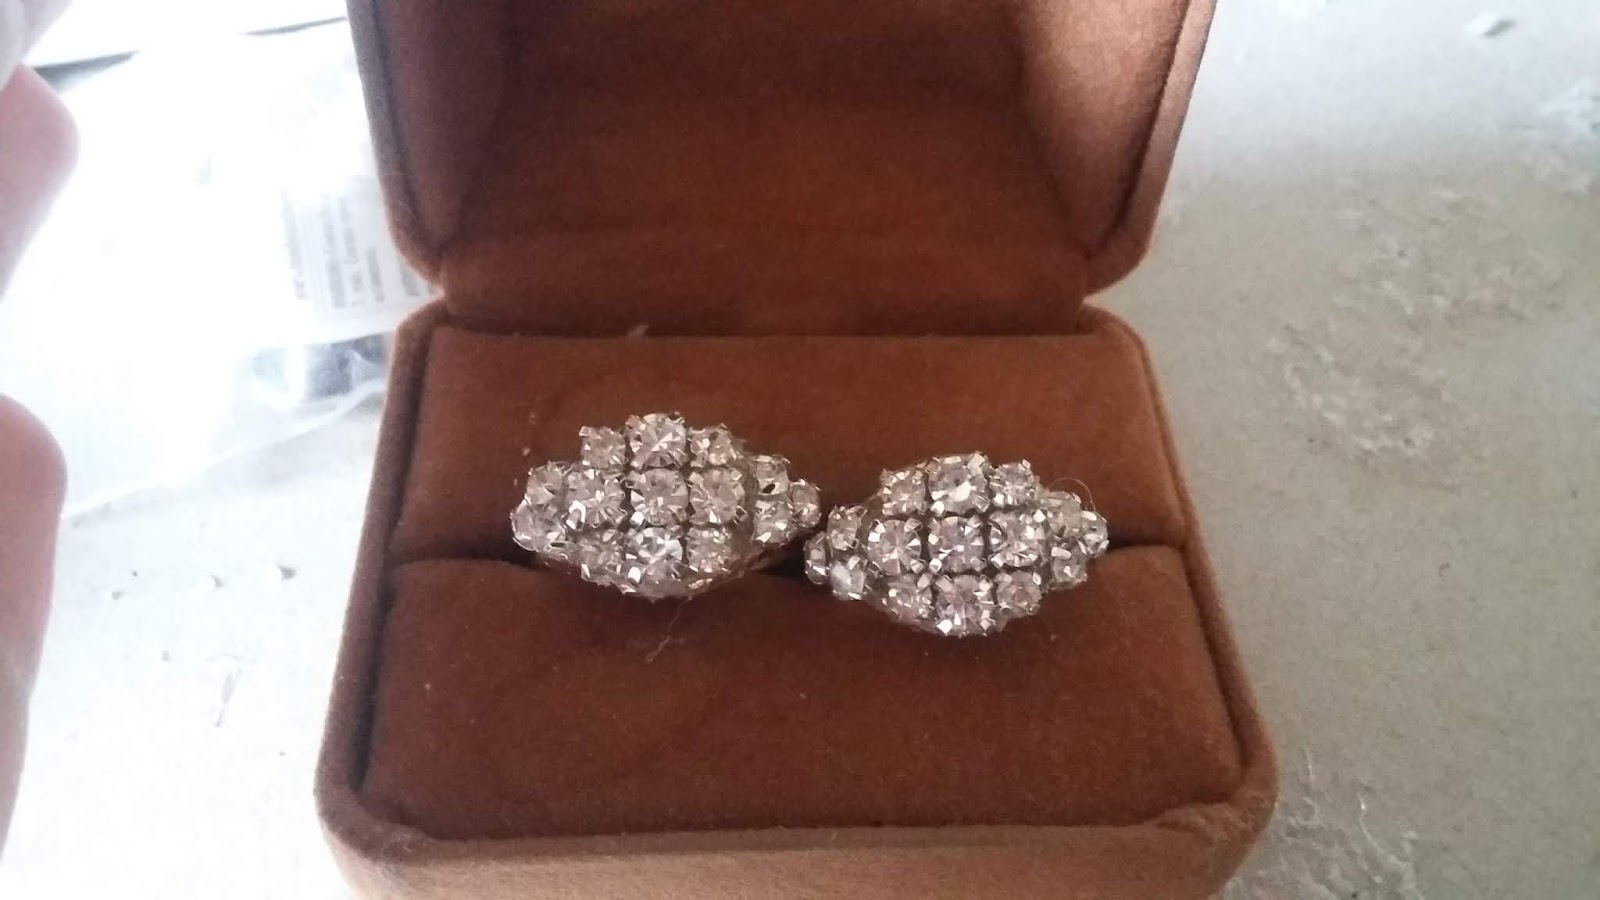
I'd been searching for a bunch of gaudy cocktail rings that both looked correct and were affordable, but style and price and quantity never worked out, so I decided to just make them. It ended up being fantastically cheap that way, too. The first set I made with ring blanks I already had, plus 3mm and 4mm rhinestones (fortuitously left over from King George's crown).

The second and third sets were "designed" (and I use that term that loosely) based on Georgian jewelry and the rhinestone sizes I had. The blanks were chosen based on size accommodation and interesting detail: the prongs on the side are reminiscent of a crown and a little more ornate, and I knew I'd be able to bend them out of the way if I needed more space for the rhinestones.
18x25mm. Seller photo. Found here.
18mm. Seller photo. Found here.
One is 18mm with a single matching stone, just to look oversized and ridiculous; and the other is 18x25mm using a single 13x18mm stone surrounded by some 4mm stones, which is equally oversized and ridiculous but also imitates a stone layout fairly common on 18th century rings.


Earrings and Necklace/Brooch/Whatevers
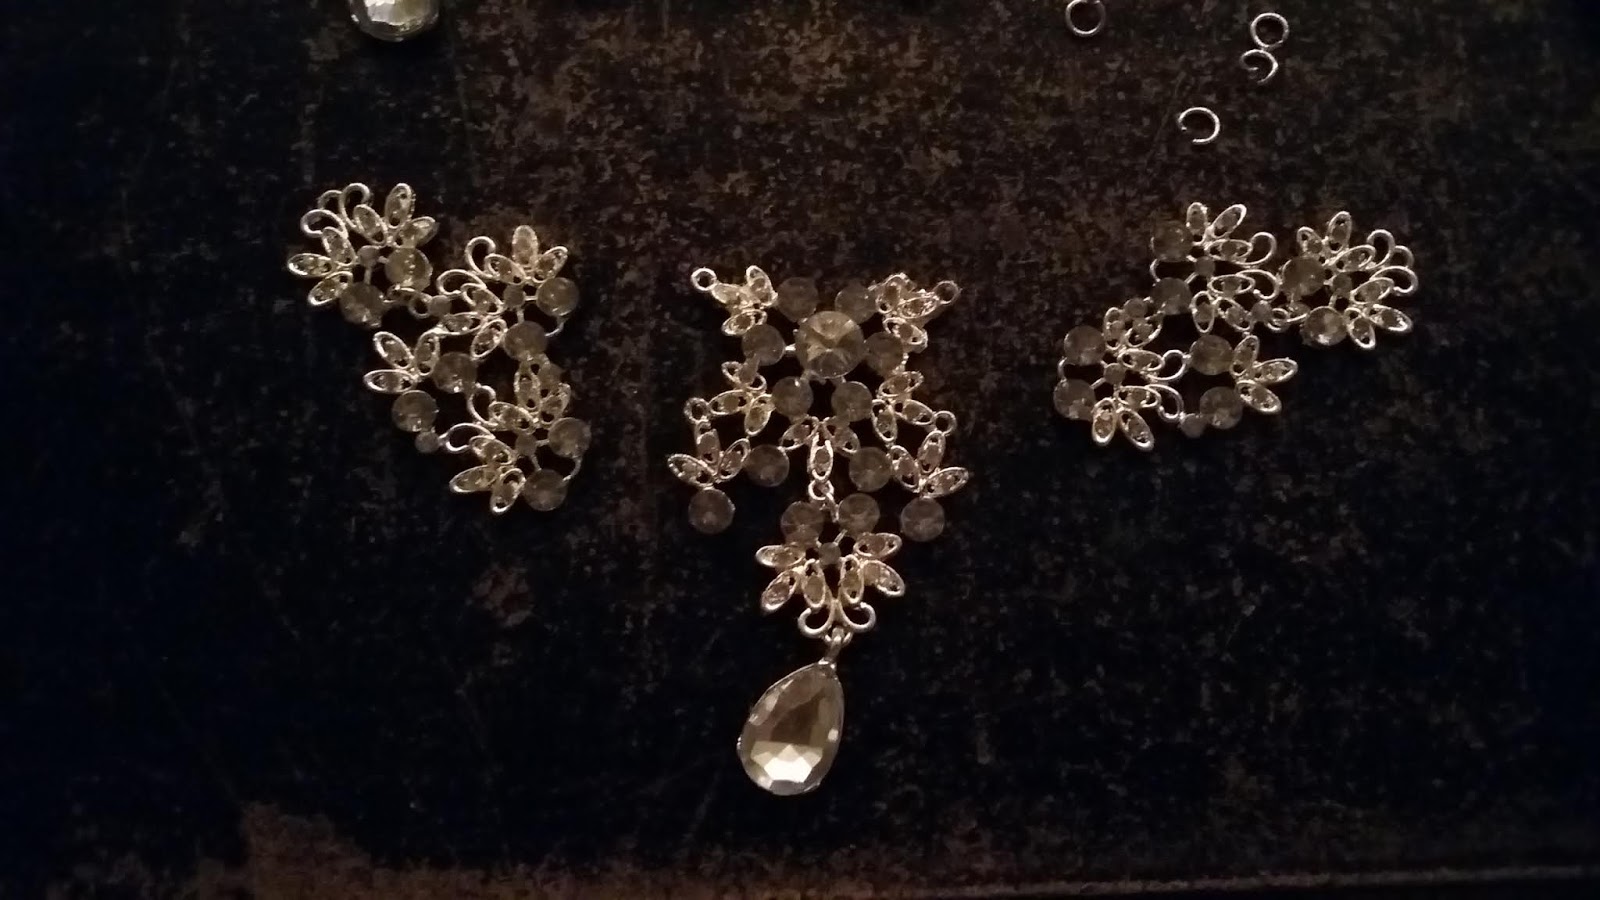
Aside from the mini portraits I already had, earrings were the first jewelry piece I was completely decided on using. I came close to buying some really good options, but then found a necklace/earring set that looked really promising. Even though I'd scrapped the idea of a necklace in the traditional sense (too much interference with neck wound makeup), I figured I could pin the necklace to the dress like a weird brooch thing.
Fig. 1. Weird brooch thing. Found here.
They were a little funky in person and needed some work, so I initially just added more rhinestones and repainted everything darker - with DecoArt Dazzling Metallics in Shimmering Silver as a primer, topped with Jacquard Lumiere in Pewter sort of lightly drybrushed on.  On the necklace, I also removed the chains and the round rhinestone links on the sides.
Don't know why I didn't photograph the earrings, too. ¯\_(ツ)_/¯
That itself was a big improvement. But then I decided they weren't large/obnoxious enough. So I ended up ordering two more necklace/earring sets to harvest for parts, which were modified with rhinestones and paint the same way.

For the earrings, I took the posts off both pairs and the teardrop rhinestones off one pair (and set the extra teardrops aside for the necklace mod later). The piece without teardrops was turned upside-down and connected to the piece with the teardrop, and then the posts were reattached at the new top.
Earrings on the left are brand new before any mods at all, and right is the result of the second round of mods.
The necklaces... I don't even know what to call these, really. They sit where a brooch would, but they're shaped more like a necklace, and they're actually built from both. Who knows? But I love them.

Each one ended up being Frankensteined from parts of two original necklaces, the extra teardrops from the earrings, and a separate brooch. I had already ordered some brooches in a similar design to go in the hair with a bow and some ostrich feathers.
Seller photo. Found here.
When they arrived, I realized they were a little large and heavy for the hair, and I liked them better on the dress. So I decided to remove the centers of the necklaces, replace them with the brooches, and then use the necklace centers for the hair instead (more on that later).

The brooches got the same paint and rhinestone treatment.
Left is repaint only, right is repainted and added rhinestones.
On the necklaces I removed the round side rhinestones and chains again like before, and disconnected the centers...
...and removed the teardrop rhinestones from them, keeping the teardrops and setting the rest aside (for hair doodads later). I used the extra connector rings to attach the remaining necklace pieces to each other and the brooch. The teardrop rhinestones from the center necklace pieces and leftover from the earrings were clipped onto the necklace at strategic points to match the teardrop on the brooch.
There were a few minor tweaks after this, and ribbons are still up for debate, but this is pretty much before and after.
TLDR: each pair of earrings is built from two pairs, and each necklace is built from two necklaces and earring remnants and a brooch (so 4 necklace/earring sets + 2 brooches = 2 finished sets), and everything was repainted and further bedazzled.

It still wasn't quite fussy enough, so I've been playing around with some little bows of black organza ribbon. I'm still not sure about them, but if I use them, I'll add three to each side, essentially between what was originally each separate chunk.
And that's pretty much it!


Stay tuned for Part II!

UPDATE: On the night of the event, with everything on we decided the necklaces as brooch collar things didn't quite work how we wanted. Weirdly, it made them less ostentatious somehow. So with some extra black organza ribbon, I turned them back into necklaces. Wacky hijinks!


Thursday, July 5, 2018

French Revolution Zombaes - Testing and Prep

You wouldn't know it from my activity here, but I've actually been really busy with costuming! I've been steadily working on French Revolution Zombaes, but because everything's being budgeted and I'm waiting on stuff to arrive, I've been picking away at different parts of the costume bit by bit. So I initially thought I'd wait until I had whole chunks done to post about them. Some things are finally coming together now, but even though there's nothing totally done, Labyrinth is just shy of two months away. So I thought I'd better get to it!

It's been an ongoing and evolving work in progress, but in the the last few weeks I finally got down on paper what I've been thinking about for a design.
Dress:
-white cotton voile, possibly over a black satin-y lining
-3/4 "poofy" sleeves
-single drawstrings at the neckline and waist
-ruffles at neckline, sleeves, and hem
-ribbon waist sash (probably moire)
Hair:
-very large hedgehog (probably a wig)
-fascinator thing with at least two ostrich plumes, a rhinestone brooch, and a black ribbon bow
Jewelry:
-Marie Antoinette mini portrait on a bow
-"MA" lady-in-waiting badge on a bow (inspired by contemporary Russian examples)
-large rhinestone earrings
-large rhinestone necklace worn at the neckline like an oversized brooch
-several rhinestone rings
-SO. MANY. RHINESTONES.
Makeup:
-either general deathly pallor, or pallor with early/minimal zombification rot
-light dirtiness from crawling out of the grave
-prosthetic appliance for the stitched-up decapitation

Of course I already have the Marie Antoinette portraits I made way back. I'm still tempted to redo older Marie, either with a different portrait entirely (why, oh why, did I not think to use her infamous chemise gown portrait???) or at least a better quality print. But that'll come down to last minute tweaks.


I also have little crown brooches to add to the centers of the bows, and I might add more ribbon too (the theme with almost everything on this project so far has been "when in doubt, add more"). All the jewelry really needs a post of its own, so more on that later.

And typically, everything else is a lot of mockups and prep and waiting right now.

Back in May I ordered 1780s stays from Historical Designs on Etsy.
© Historical Designs
They'll be plain coutil, with front and back spiral lacing. Her work looks and sounds amazing and I'm beyond excited to get my stays in the next few weeks.

I can't properly start the dresses or petticoats until the stays are in hand, so in the meantime I've been focusing on accessories, starting with the bum pads and pockets. The cost for both was basically nothing, as I used old fiberfill and scrap fabric, which was awesome. I used Simplicity 8162 (the first American Duchess underpinnings pattern) for the bum pad, and Simplicity 3635 for the pockets. Both are fairly straightforward so there's not much to say or show, but I did make a few experiments and tweaks.

On the bum pads, I made the first one in the largest size thinking bigger is better - and it is, with caveats. I initially overstuffed it, and both it and I didn't look right while it was worn (very stumpy and stocky, which is already a problem for me being short, high-waisted, and curvy). So I made the second one in a smaller size and stuffed it more conservatively, then pulled some stuffing out of the larger pair and it too looked much better with less stuffing. The two sizes really only differ in how far they wrap around to the side and front of the hips: when viewed from the front, the larger size gives a little more width. As it turns out, having two sizes was perfect. My friend and I have the same hip measurement, but our proportions are different: she has wider hips, I have more butt. So with appropriate stuffing in each bum pad, the smaller size with volume concentrated in back was better for her, and the larger size with some extra volume on the sides worked better for me.
She won't sleep in her actual cat bed, but apparently bum pads are good enough for nap time.

On the pockets, instead of using bias tape for the opening and outer edge, I did a facing on the opening (adapted from the Simplicity 4923 shirt) and just sewed a normal right-sides-together seam along the edge. There was honestly no reason for this except that I didn't have any bias tape and was too cheap/impatient to go out and buy some. I had plans to embroider Marie Antoinette's initials on the pockets, either by hand or machine, but that didn't pan out. I do want to make another pair someday, so I'll definitely try embroidery next time.
We're very mature costumers, clearly.
Both the bum pads and pockets are kind of 99% finished and tucked away right now and waiting some last minute tweaks, namely checking the fullness of the bum pads when all the petticoats and dresses are done to see if they need more oomph to support the weight. So I'll get finished photos when everything's assembled.

With those base underpinnings done, I did eventually make a rough mockup of the dresses to get an idea of what my game plan was. I primarily used Fresh Frippery's awesome tutorial, as well as looking at the chemise gown American Duchess made from it too. The tutorial calls for three lengths of 55" fabric, or 165" total circumference, and I had ordered enough to account for that. But I'm playing with the idea of adding a black lining (for more dimension, and it gives a nice spookiness factor), and as American Duchess advises, 165" is very full to begin with and the thicker the fabric, the bulkier the dress. The lining I'm thinking about is the same fabric I used for the Lucille Sharpe nightgown, and luckily I had some yardage left over. So I made two mockups of 165", one with a lining panel sewn into the front and one of just voile.

The mockup with the lining wasn't terribly puffy, and maybe I could have gone with 165" and been fine, but after the bum pad puff debacle, I decided to cut down the fullness and scale it back to the 138" given for the chemise gown in Norah Waugh's The Cut of Women's Clothes: 1600-1930. I've seen lots of people make that version and they turn out perfectly suitably full. I tested the voile-and-lining mockup at 138" and liked it, so I cut the just-voile mockup down to 138" as well so they're both prepped for eventual construction. I ended up with something like this...

It's kind of strange - and honestly really great - how quickly during construction these dresses come together and actually look like what they are, even without the sleeves and finishing.

Even though I'm happy with the 138" circumference regardless, I'm still undecided on the lining. I'm not too worried historical accuracy, as these are zombie costumes, after all. I want things to look basically era-correct, but some artistic license is required. And they'll be torn and weathered, so there's also no need to consider HA for the sake of wearing these to reenactment-type events (I'll eventually make proper versions for that). I do really like the look of the black underneath, but it's just not at all actually necessary. The decision may ultimately just come down to time and money; there are still a few essential things to make and buy that take precedence.

Just yesterday I did a mockup of the shift using Simplicity 8579 (American Duchess's newest underpinnings pattern). Not really anything to show there, at least until I have the finished shifts done. I do need to decide if I'm going to do the HA French seams, or just say "eh" and leave them raw or finish them with overcasting or something. The pattern went together really well, and despite being worried that the pattern size I'd bought was too small, with the ease it ended up being almost a perfect fit (aside from bust, which stays will deal with; and upper arm, which I can adjust to be roomier).

I've also done one hair test. I'm not into the idea of HA pomatum and powder products right now (see a trend with this project?), so I researched and asked around for modern equivalents. I ended up using Murray's Superior Hair Dressing Pomade from a suggestion by American Duchess, and plain ol' all-purpose flour because it was the closest thing I already had in the house. I didn't really follow any one tutorial, as I used a lot of different sources and research, but the videos by The Dutch Milliners and historical portraits were especially helpful. I put the pomade in my hair while it was damp, then let it mostly dry before curling it very small sections with the smallest foam rollers I had. After setting overnight, I took the curlers out and let the hair relax. With more pomade on my hands, I broke the curls apart, then powdered everything - focusing on the roots - with sifted flour and a fluffy brush. I pinned the top into a sort of bouffant, then pinned the sides into place where I wanted them.
I think I need to use more pomade and a finer powder, and the sides need more teasing or rats for support. But I'm really pleased with it as a first attempt, and I think it'll be a good technique for more realistic historical costuming someday. Ultimately I don't think it's big enough for this project, though, which is all about excess and taking things to the extreme limit. So I'll probably be getting a wig (likely the Lioness wig everyone else seems to use to great effect) just to make it that much more extra.

In anticipation of building huge hedgehogs, I got a bunch of mesh bun donuts to cut into oblong rats to support and fill out the sides better.
One of the dumbest things I've bought for a costume ever. Thanks, Dollar Tree.

Coming up next: SO. MANY. RHINESTONES.
Friday, May 4, 2018

Vague Updates or Something

The end-of-semester school crunch is in full swing, so not much else has been going on around here. BUT...

King George is still very much in-progress. He's taken a backseat to some other impending costume deadlines, but I'm still casually picking away at it. I painted the whole crown with DecoColor Premium gold paint pens, which had turned out well in swatch tests. But like the liquid leaf paint, it turned out hard to get a smooth non-streaky surface on the larger flat areas, and I ended up hating it. So now I'm in the process of sanding that off as much as possible and looking for yet another gold option. Top contenders right now are gold leaf and spray paint. Gold leaf has the potential for an amazing finish but really depends on my ability to apply it well, and could be either easier or harder to work around the rhinestones (don't have to tape anything off, but also have to manually work around every stone). Spray paint has the benefit of being quick and easy, but I'll have to tape off the rhinestones and the finish will never be as dimensional as I want. This whole process has been so out of the ordinary and experimental for me, I'm also seriously considering just relegating this crown to a glorified mock-up (probably finishing it, and maybe trying to sell it or use it as a back-up?) and making a second one out of metal. We'll see what happens.

We did make it to the Great L.A. Air Raid in February, and it was a blast! It'll definitely be a yearly event for us. We assembled a civilian outfit for my friend from a combination of our regular vintage-esque clothes (my red crepe chiffon blouse and brown belted jacket, and her plaid tweed trousers and saddle shoes), and I wore an unholy amalgam of several mismatched uniform pieces (modern lookalike Army 5-button sweater, replica Army HBT pants, authentic Navy leggings, and USMC EGA pin, oh my).

And French Revolution Zombaes are a go for Labyrinth Masquerade. Most of the fabric has been bought, design is finalized, petticoats and dresses will hopefully be started in the next few weeks, and I'm getting ready to order stays and sourcing some fabulously gaudy rhinestone jewelry. Exciting stuff! Full post on all that coming soon once things get rolling. Stay tuned!

Thursday, January 11, 2018

Beetlejuice - Recap

I did a worse-than-usual job of documenting it, but I did in fact make Beetlejuice costumes last year.  The plan came together kind of pell-mell and I was more concerned with just getting it done than taking a bunch of photos.  But they turned out really well, so I thought I'd try to throw together a post for them.

Lydia was ridiculously easy and I improvised most of it, and because of that was one of the most fun things I've made in a long time.  The dress is basically a loose-fitting T-shaped sack, with a solid layer underneath and lace layer over it, and dickie with collar. So I started by folding a sheet both lengthwise and crosswise and cutting half of a T for the underlayer.  There are folds on the top and left, and raw cuts all along the right.

I used a t-shirt to mark and cut the neckline, then cut the top off a black blouse to use as a dickie for the separate underneath collar layer.  At that point I altered the neckline to accommodate the collar.


The sleeves ended up being a tad short so I added a ribbon ruffle, then gathered the cuffs with elastic.

I used the solid T of the underlayer as a pattern for the lace layer, which is the same shape.  The only difference is the lace layer had no sleeves.  I cut large half circles the length of my arm from the same lace and sewed those over the shoulder to make the little cape-style faux sleeves.  To give it more fullness, I used some shorter rectangular scraps to add another layer to these capes (not shown here).  Once all the lace was assembled, the dickie and dress layers were sewn together.

I also painted three strands of plastic beads black for the necklaces, and used some scrap ribbon for the choker necklace.  Black tights and boots from my closet and an old Halloween wig rounded everything out.  All told, I spent about $16 on the whole thing.

Beetlejuice was more complex.  Finding a good pattern was a challenge, because I wanted a plain jacket (simple piecing/seams) that could still be somewhat fitted (not too boxy).  I started with Simplicity 3688 but I decided the piecing of the jacket would be too complicated with matching stripes, so I stuck with that pattern for the pants but used the button-up pajama top from McCall's 5992 for the jacket.  Alterations were fairly minimal.  For the jacket, I added a split vent in the back so it would be a bit more fitted (I could sew a smaller size so it was more fitted, but it could still fit over the hips) and created a facing and full lining.  For the pants, I fully lined them and replaced the zipper with buttons and a placket.  Literally the only photo I have of the construction process is a shot of matching the stripes, which I was really proud of doing so well throughout the costume.

But my friend got a proper photo when she wore it at Labyrinth Masquerade.

We also busted them out for Halloween (the only photos I have of Lydia finished and being worn so far).

We ended up with a decent amount of leftover fabric, so sometime this year I might make Beetlejuice a skirt option (again, probably with Simplicity 3688).  All in all, it was a really fun pair of costumes to make, and super comfy and fun to wear. They'll definitely be making more appearances.

Tuesday, January 9, 2018

Hamilton - King George Crown / Collar Part V + Star Part III

My inspiration after seeing the show in September is still going strong, but between school and holidays and getting sick, time has been short.  I did finally manage to make some notable progress this past week though.

Firstly, I finished the chest star badge!
I did end up making some changes from the show's design and what I had planned, namely the silver paint.  I could say it was for the sake of creativity or originality or personalization, but in truth it just wasn't looking right after the way I had to go about making it.  The silver paint I added to the background hid a few sins and made it look a bit more dynamic, so all in all I'm happy with it.

As far as crown progress goes...

Because the edges of the bead trim were visible on the back sides of the vertical strips, it was looking a little rough, so I cut some 1x9" strips of cardstock and glued it over the back to cover it.

Back when I started posting on the crown, I gave a little preview of the filigrees/beads/gems/rhinestones and said I’d come back to it when it was more relevant. I’ve been putting off organizing that because there’s so much to slug through, but here we are.
  • The top cross and ball use 30mm teardrop pearl pendants (2), 12mm beads (2), 5mm round red cabochons (8), 18mm round clear cabochons (2), and 4mm round clear rhinestones (about 75). I initially got 6mm beads for the sides of the cross but they ended up too small, so I used the 12mm on the sides too.
  • Each vertical strip uses 25mm square filigree stampings (2), 13x18mm oval red rhinestone (1), and 4mm round clear rhinestones (10).
  • Each Maltese cross around the base uses 25mm clover filigree (1), 18mm round clear rhinestone (1), 8mm round blue rhinestones (2), 8mm round red rhinestone (1), 8mm round clear rhinestone (1), 6x12mm navette clear rhinestones (8), and 3mm round clear rhinestones (16)
  • Each fleur-de-lis around the base uses 8mm round blue rhinestone (1), 8mm round clear rhinestones (9), 4mm round clear rhinestones (18), and 3mm round clear rhinestones (11).
  • The horizontal band uses 25mm square filigree stampings (16), 13x18mm oval green rhinestones (4), 13x18mm oval red rhinestones (4), 13x18mm oval clear rhinestones (8), and 4mm round clear rhinestones (64), and 3mm round clear rhinestones (64).
And of course there were some whoopsies. For everything that uses 3-4mm rhinestones, I initially mis-measured and bought 6mm which ended up too big next to the 8mm stones, so I had to buy smaller replacements. I also had to buy more than I needed for pretty much everything, which was a hassle, so total cost and actual cost will end up fairly different on this project.

I started with the 18mm round clear stones on the centers of the Maltese crosses, then did the 13x18 oval stones around the base, then the 13x18 red stones on the vertical strips.  There's not much definitive strategy to this, but I am kind of working my way down in size since that seems to be the easiest way to handle it. 

The stage-used crowns have a specific asymmetrical pattern to the red/green/clear oval rhinestones on the horizontal strip around the base (and the real historical crown has a similar asymmetrical pattern). I couldn’t figure out exactly what the pattern was, and the asymmetry bothered me, so I simplified it: stones under the crosses are green, stones under the fleur-de-lis are red, and stones in the spaces between crosses and fleur-de-lis are clear.
Over a few more days, I managed to finish the rhinestones faster than I thought. The larger stones took quite a while because with their weight, I had to hold each one in place as the glue set so they wouldn’t slide around.  The smaller stones being lighter didn’t really drift much if at all while they were setting, so I could move faster from one to the next.  I also added stones around the ball on top after this.


All told, there are about 550 stones (!!!) on the whole thing.

I also assembled the livery collar. I’ve been waiting since there aren’t many places to easily store it as a whole piece, but I’m getting close to starting on the cape so I wanted the collar ready to go for that. (I was also bored and antsy and the collar was an easy thing to get done.)


x

Monday, January 8, 2018

2017 Recap + 2018 Plans

I had a really ambitious project list for 2017, and I didn't get even half of it done. As usual, my eyes were bigger than my wallet and calendar. But what I did manage to get done, I'm actually really happy with.

Mall disguise Cap and Nat (Captain America: The Winter Soldier) got another outing at Long Beach Comic Expo in February.

Both were already finished costumes, but Cap had some notable upgrades: finished shoes (same I usually wear, but repainted to look more accurate), new wig, new shield, and getting to wear my real glasses with new semi-accurate frames instead of fake ones.

Thomas and Lucille Sharpe's murder nightgown party costumes (Crimson Peak) were finished in March for WonderCon.
I don't put much stock in my sewing/costuming skills, but Lucille's nightgown and robe and everything that went into them made me appreciate that I do actually have some skill.

Wayne and Garth (Wayne's World) also made a WonderCon appearance. They're old costumes and very simple despite being crowd-pleasers, but it was significant because (like with mall!Cap) I used a new wig and got to wear my real glasses. (No photos of the upgrades though, because whoops.)

I made a quick and dirty circle skirt to go with my Her Universe cardigan and did a vintage Disneybound Imperial officer for spring Dapper Day in April. Fabric stash and closet cosplay save the day again.

Jack Sparrow and generic pirate!Norrington were done-ish (wearable) for Pirate Invasion in July.

They're really only a start, but a solid start that worked well. I pretty much want to do nothing but sew 18th century shirts now.

We got Beetlejuice, Lydia, and ghost!Thomas done for Labyrinth Masquerade in August.

Lydia was a fantastically fun, easy, cheap project, which was a nice change of pace despite still being another project with a tight and specific deadline. Beetlejuice and Thomas were more exercises in creativity, and made me appreciate my skills again like Lucille had.  (The photo of Beetlejuice and Lydia is from Halloween; we didn't end up with any photos from Labyrinth.)

And I (finally!) started some spoopy Halloween skirts, and planned a space-themed skirt for extra credit in my astronomy class (which I didn't finish in time, but I'll definitely still get to some day).

Not bad all told. I always feel like I don't accomplish much in a given year, probably because the things I don't finish outnumber the things I do, so recaps are wonderfully helpful to remember just how much got done.

And looking ahead...

I've already proclaimed 2018 the year of the UFOs (unfinished objects, that is). I always get frustrated with myself for being really ambitious, starting big projects, and then running out of time and energy. The deadline passes, I get depressed and lose interest, the projects sit there, and I start new ones instead of finishing the old (new is more exciting because it doesn't have the stigma of failure already attached). 2018 is going to be the time to break that cycle, even if only temporarily, and clean out the materials stash.

New projects from 2017 that didn't get finished are at the top of the list. Vintage Disneybound Hades and Maleficent didn't pan out for spring or fall Dapper Day, but the design work is almost done and we have all of the materials. We're also comparatively close to done with our Reserve TIE pilots: we have most of the pieces, and the few we don't are at least sourced. We found a solution to the hold-up on our belts, and the jumpsuit mods should be easy.

Next come older projects that were never finished or need overhauls, starting with Hocus Pocus. Sarah and Mary Sanderson were wearable for Mickey's Not-so-Scary Halloween Party at Disneyland a few years ago, but Sarah was in a really sad, slapdash state and Mary needed some improvements. I've since lost interest in finishing Sarah for myself right now, so if I don't force myself to finish that on principal I'll make a Winnie instead, and Mary will get properly finished. Alternately, we're tossing around the idea of doing Winnie and Billy like we'd initially wanted. (And no, starting two new costumes is hardly finishing UFOs, but in this case I look at Hocus Pocus itself as the project more so than the specific costumes, so whatever finishes the project in an enjoyable way is ideal.)

Less complete but still definitely in need of finishing are our Haunted Mansion costumes. They were the plan for Halloween at Disneyland the first year we went, but they ended up being more complex and time-consuming than I thought, and Real Life cut in.  The tightrope walker needs a complete do-over, and the dynamite guy is about half done with some changes to make.

There are a few somewhat in-progress but very laid-back found-item costumes that could get finished, if only because it would be easy to so why not. Sharon and Nat's Berlin costumes (Captain America: Civil War) are both very close to done: we need a new jacket for Nat, and dyeing Sharon's vest is optional, but otherwise both are complete. The Tramp and the Kid (The Kid) are good contenders too: Kid is done except for suspenders, and we've started sourcing Tramp's pieces.

I'm also set on finishing as much of King George as possible. I really want to wear the whole costume for Costume College and Labyrinth Masquerade, but I also don't want to push myself to finish too much too fast (that's how UFOs spawn). So at the very least I want to finish the accessories - crown, collar, scepter, cape, shoes, wig. I've already decided I can wear those with a red union suit and make the unfinished costume a bit of a gag.

For costumes already on a list somewhere but not technically started yet, we have French Revolution Zombaes, Gibson Gothic, and Lost Hope ballgowns. They'd be good options for Labyrinth Masquerade, and the historical bases sans creep factor would be good for the historical costuming world we're dipping our toes in. Any of those would be good for the big project of the year.

A few finished costumes also need repairs or upgrades: Lucille's robe needs to be repainted and her nightgown needs a paint alternative to the fake blood (way too messy), Thomas's black vest needs to be remade, Beetlejuice might get a skirt alternative.

Brand new projects will (hopefully) be few and far between. But we'll see. We're planning to go to the Great LA Air Raid next month, so depending on what I can dig out of the closet or find ready-made, that might require a few new pieces.

So here's the tentative tally for 2018:
  • Vintage Disneybound Hades and Maleficent (Hercules and Sleeping Beauty)
  • Reserve TIE Pilots (Star Wars)
  • Sarah and Mary Sanderson, or Winnie Sanderson and Billy Butcherson (Hocus Pocus)
  • Tightrope Walker and Dynamite Guy (Disneyland's Haunted Mansion ride)
  • Sharon and Nat in Berlin (Captain America: Civil War)
  • The Tramp and the Kid (The Kid)
  • King George accessories (Hamilton: An American Musical)
  • French Revolution Zombaes or Gibson Gothic (historical/original), or Lost Hope Ball (Jonathan Strange and Mr. Norrell)
  • 1940s something or other (historical/original)

Monday, October 9, 2017

Hamilton - King George Crown / Collar Part IV + Star Part II

It’s been an age since I’ve had proper time to work on this (Labyrinth Masquerade was AWESOME, but then school started the week after).  But I saw the show at the Pantages last weekend (IT WAS INCREDIBLE) so I’ve been desperate to make some progress. (I also now have two potential events to wear this costume to next year - Costume College's Gala, and Labyrinth Masquerade - which means I have to get back to working on it regularly.)

I finished the filigrees on the crown.  There should be an extra one on each vertical strip right at the top of the curve, but I when I ordered the filigrees I had only figured on 24 total (2 per vertical strip and 16 for the horizontal band) rather than 28, so I came up short.  The ones around the band seemed more important and were easier to secure, so I did the full 16 there and skipped the last set on the vertical strips. 

I’ve also been playing with paint some more.  I still love the Liquid Leaf, but on some of the materials it was giving me a better shine than on others so the lack of consistency was starting to bother me.  I also haven’t figured out a way to get a reliably smooth finish over large areas yet.  So on the collar pieces I went over the Liquid Leaf with a DecoColor Premium paint marker.  The gold tone is a little more white/pink than the yellow/brass I wanted, but the shine is stronger. And the crown color varies a bit in photos anyway. So I’ve made peace with the compromise for now.  There’s still one more alternative/test I’m considering for the crown, so we’ll see.

In the meantime, I sprayed the crown with a sandable filler primer to fill in some scratches, then a black primer to give the gold a good base.

And I’m still picking away at the embroidered star badge.  I’m about halfway through the little starburst lines. I was initially going to stitch ALL the starburst lines the same way I did the edge and the lines at each point, but it was extremely time consuming and tedious, and looking at more reference images I realized the starburst was a bit more solid than I had assumed. So I left each point line of the starburst, but now I’m filling in the rest of it with single stitches/lines, and I actually really like the effect. Because the cross in the center is so small and fiddly, I’ll probably do single lines of thread there too.

After seeing the show and now knowing how key the scepter is to the costume, I’ve decided I definitely have to make it. But now that I’m in the home stretch with the crown, I’m waiting until that’s totally done. And again looking at more reference images, I was reminded that the garter is a separate piece from the pants, so I’m back to the original plan of making the garter as its own thing.