Current Projects

Monday, June 8, 2020

HB The Revolution 2019

(I'm slowly slogging my way through the backlog of events from the last year that I never got around to posting. Bear with me.)

Going to the Huntington Beach Historical Society's annual Revolutionary War event, The Revolution, was so much fun in 2018 that going back wasn't even a question. With chemise dresses and full undergarment sets already done, conveniently being able to go in costume was just a bonus.

I did a poll on Facebook asking which side I should support: American/French or British? A few scallywags voted British, but the overwhelming majority kept it patriotic. To be honest, my major inducement to do a British impression was because I wanted to wear a miniature portrait of Horatio Nelson c. 1781, and can you blame me?
Captain Horatio Nelson, by John Francis Rigaud, 1781, via Royal Museums Greenwich
But I did ultimately decide to go American if only to appease my ancestors.

Most of my ensemble was already done from making French Revolution Zombaes in 2018. I reused the chemise dress, sash, and most of the undergarments. To account for winter weather, I got a thicker long-sleeve shirt (cut down to elbow-length) for a new shift. To transition the costume to daywear and make it more appropriate for a middle class British North American colonist, I made a second petticoat in blue, a matching neckerchief (based on one made by The Dreamstress), a new hedgehog wig, a Gainsborough/portrait hat, and a miniature portrait of George Washington. I also wore some other vintage/antique jewelry - earrings, bracelet, and rings - from my stash. Most significantly, not wanting to wear and hide sneakers again and without any decent alternatives, I gave in and bought the American Duchess Kensingtons in oxblood I've been lusting after for ages, with the James buckles. They're admittedly a little difficult for me to wear with my foot/joint problems, but I still love them.

The hat.
With the old French Revolution Zombae wig, not the new wig


The George used in the mini portrait.
By Pierre Eugène Du Simitière, 1779, via Princeton University Library
It was chilly and breezy, not unusual for southern California in winter but definitely cooler and more blustery than the year before. (We were lucky to be there on Saturday, as on Sunday it straight up rained.) Being in thin cotton dresses, a few people asked if we were cold, but with full tights, two petticoats, stays, and a decent weight shift, we were actually quite comfortable even into the early evening when we left.
I forgot to bring cash and the library's ATM was broken so I miraculously left without any books from their Revolutionary-themed sale. I bought about 10 last year and still haven't read any of those, so really this was no big loss, though I do regret missing out on the 1776 film soundtrack record. We did find a Franco-American alliance cockade that my friend got to go with her French-inspired ensemble.

We met some fantastic people throughout the day. A photographer duo asked if they could take our photos and very kindly sent us copies after.

We also wandered into the tent of an artist who was set up selling his work and taking photos of the event, and he sent us some candid shots as well.


All in all it was a great outing, and for being my first real attempt at historical costume at a historical event I'm really pleased with the result. This will definitely be a new staple in the costume/event catalog.


Saturday, March 28, 2020

Costuming in the Time of Pandemic

All jokes aside, YIKES.

It's been a rough few months of winter and spring for everyone, and for me it's followed a difficult few months last summer and fall. As a result, even though I've still been sewing and crafting and going places (before lockdown this month anyway), I haven't had the time or energy or sometimes the memory to document any of it. Now with more time on my hands than usual, I'm hoping to go back and catch up on posts about last year's events and costumes, many of which have been sitting here as unfinished drafts.

In the meantime I'm also switching costume sewing over to medical mask sewing, and I highly encourage anyone with the means to ask around in your communities or on social media to see if any facilities could use help. The Million Mask Challenge groups on Facebook accept members nationwide and internationally and offer resources for constructing and donating masks in approved designs where they're needed most.

Stay tuned!

Tuesday, June 25, 2019

1780s Continental Army Gainsborough/Portrait Hat

Guys, millinery is hard.

The Huntington Beach Historical Society's annual American Revolution event was back in February, and I'd been planning to attend in costume for a long time (definitively since I finished my chemise gowns in August, but theoretically even since last year's event). I had last year's French Revolution Zombaes dress and undergarments as the base, but I needed new accessories for a bit more historical realism and less theatricality. A hat was a major part of that.

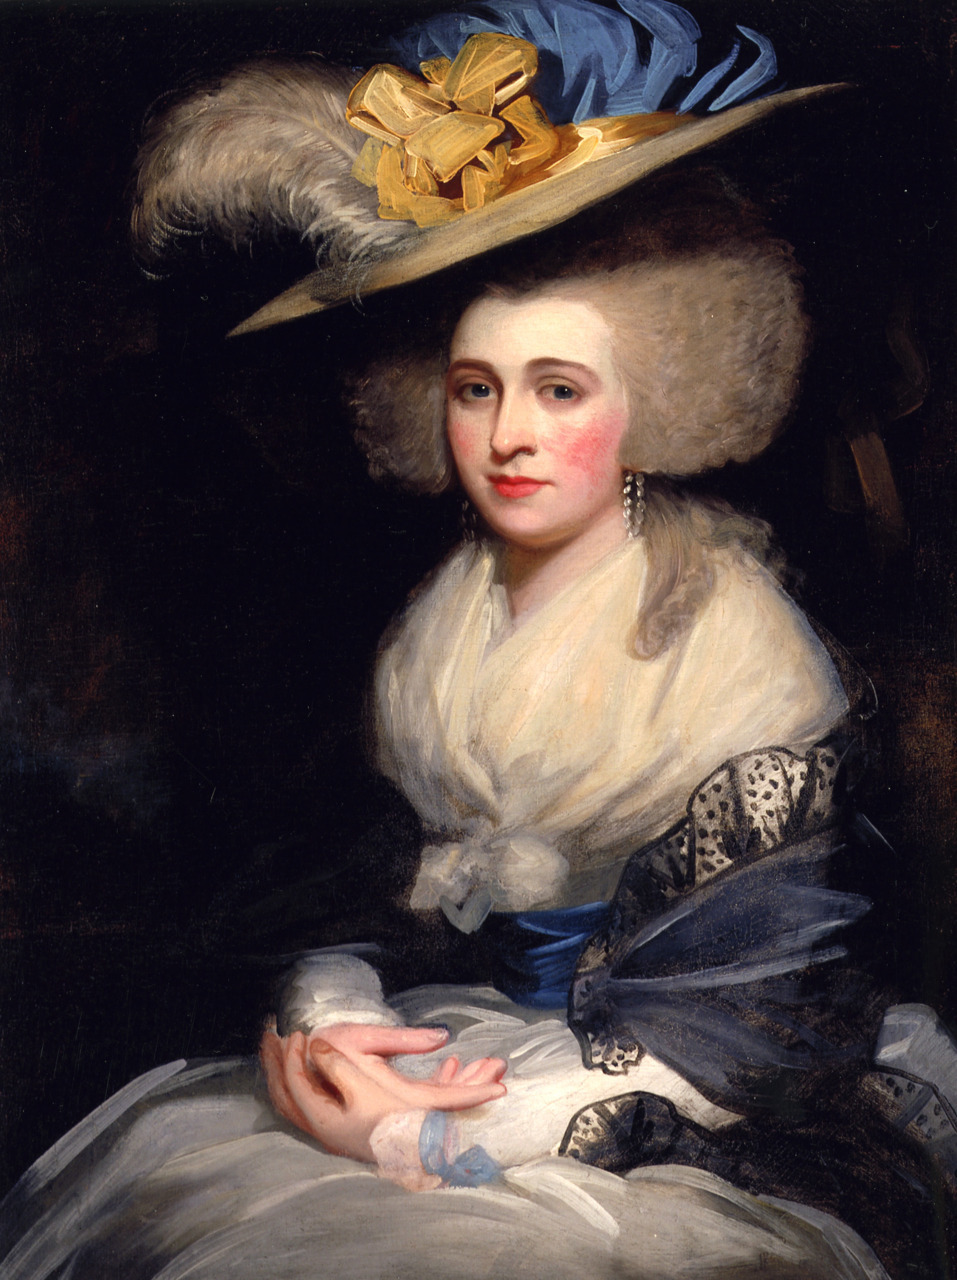
I used a lot of historical portraits and illustrations for design inspiration. Dames a la Mode's Hats From History is a great source, and this portrait in particular was one of my main starting points.
Abigail Adams Smith, 1784 via Hats From History
It took me a long time to come up with a theme and color scheme that wasn't too theme-y. I was making this for a colonial American impression.  But red, white, and blue gets real match-y real fast. I ultimately went with Continental blue, buff/white, and gold. Classic, aesthetic, and patriotic without being PATRIOTIC.

I used American Duchess's Amazing Craft Hat (Part 1 and Part 2) as a reference for construction, starting with a straw craft/gardening/? hat and reshaping the brim to give it that curve in front and back.

By chance as I was thinking about fabric options, I found navy blue silk track pants (???) and a black tulle-lined evening gown for dirt cheap at a vintage store sale. So I cut large circles from the silk and both the light and heavy tulle and stitched them together, gathered it, and glued it to the crown. (I chose not to cut the crown off the hat itself so the fabric would have a little more support if needed.)
Like actual real 100% silk track pants
  I had zero ribbon, so with my Continental theme in mind I got a few blues, gold, and off-white.
The red was an alternate waist sash idea that got scrapped and returned.
I layered some of the ribbons together and stitched/gathered those to create a trim for the crown, and did black bias tape around the brim edge.
This was the ribbon testing phase. On the hat itself I liked the right side with wider blue ribbon better, but the left looked better when worn with the white dress.

I was going to get some hatpins but ran short on time, so I did some ribbon ties at the sides instead. It's a little fussy and deformed the hat shape a little, but there's (kind of) documentation for it and it kept things secure. For future upgrades, I'll definitely be getting hatpins and maybe leaving the ties just as security but not having any real tension on them.

And that was the bulk of it done.
With my French Revolution Zombae wig, though I didn't actually wear them together.


In action at The Revolution
Just in the past few weeks I busted the hat back out for some upgrades.

Part of the reason I left it plain in February was because I couldn't decide on feathers or extra ribbon (bows, cockade, etc.). So I finally figured out a grouping of feathers I liked and made up a neat little beribboned cockade on the fly.


The cockade is a scrap of the same silk as the crown. The thin ribbon is the same from the trim around the crown, and the wider ribbon is the same as the ties. The button was from the stash.

I also tacked down the center top of the silk crown to the straw beneath to combat some problems with wind billowing the lightweight fabric too much. And I found some short hatpins in the stash. I still want a single long one that can go straight through the crown, but one of these on each side is fairly secure (if a little fiddly).

It's still not quite right to me somehow. Maybe it's still not frilly or ostentatious or large enough. But it's definitely an improvement and I'm really loving it.

Hopefully I'll get some more decent photos of this thing being worn at an outing next week.

Tuesday, June 18, 2019

18th Century Beetlejuice and Lydia Deetz

I don't even remember when this idea first happened, but in a moment of delusion a few months ago I decided this year's Labyrinth Masquerade was a good time to do our dream project of Beetlejuice and Lydia a la 18th century.

For the most part, the movie costumes will be translated fairly directly to 18th century fashion, with some embellishment of the film designs and thematic/dramatic exaggeration of historical accuracy. Beetlejuice will be a little dated in some amalgam of a 1770s-1780s zone-front gown with a redingote collar mirroring his suit. Lydia will be more fashion-forward in a mid-1780s chemise gown to mirror her blousy dress.

I'm using Simplicity 8161 with American Duchess's historical hacks as a starting point for Beetlejuice, and I'll be using the same chemise gown pattern from French Revolution Zombaes for Lydia with some added ruffles.

Everything's kind of at odds and ends right now. I've ordered Lydia's lace trim and we've got Beetlejuice swatches on the way, and I've been slowly gathering little accessory pieces and working on what we already have.

For Lydia's hair, I'm reusing my most recent hedgehog wig that I initially styled for HB Revolution earlier this year (more on that someday). The wig came with bangs which I removed, but because I'm a craft hoarder I saved the wefts so I was able to easily stitch some of them back on.


I unexpectedly found some amazing little bugs (crickets and locusts) at a small craft store during a recent visit home. Not completely sure what to do with all of them yet, but some will definitely go in Beetlejuice's hair and maybe in a few strategic places across the costume (I'm thinking on the shoes will be fun).

Luckily between everything from French Revolution Zombaes last year and the extra petticoats I did for HB Revolution this year, all the undergarments are already done which makes a project of this size feasible at all.

And because this is a big project, like French Revolution Zombaes last year, I'll probably break up the posts into topics.

Stay tuned!

Sunday, December 30, 2018

2018 Recap + 2019 Plans

2018 was a weird year in a lot of ways. It felt like it lasted forever, but now looking back at the end of it, where did it go??? Lots of bad stuff, but also some great stuff, and I still managed to get a fair bit done.

February brought two new events.  We went to The Revolution in Huntington Beach in "civvies" (non-costume), but it was an awesome event and we're definitely going back in costume next year (more on that below).


We also finally made it to the Great L.A. Air Raid, which was incredible.
We arrived a little later and left a little earlier than I maybe would have liked, but it was a great toe in the water for the first time attending. As I try to get into the historical costume and reenacting scene a bit more, both of these events are definitely going to be annual staples.

In April we went back to WonderCon, this year as Beetlejuice and Lydia the first day and TWS Mall Cap and Nat the second.
I added pockets to Lydia, which was great in principle, but having pockets in a lose-fitting tube dress means a bunch of weight hanging off the shoulders and neck. With my chronic neck problems that ended up being a major issue. I also decided to skip contacts but was still too committed to accuracy to wear my glasses, so strained eyes didn't help with the overall discomfort. I ended the day with a migraine and it kind of ruined the experience. Lesson learned for next time: carry a bag or wear 18th century pockets under the dress, and wear contacts. I also realized that despite putting on what appears to be fairly heavy makeup, it just disappears in photos, so I'm considering trying some heavier more glam Lydia makeup in future. Otherwise, it was still pretty fun, and seeing people's reactions was nice, especially this being our first time wearing them at a con.

Cap was much better, as always. I repainted the soles of the shoes with spray paint to hold up a little better, and added the brushed metal texture to the shield.
One of our photographer friends was there so we were going to try to get some nice photos, but it didn't pan out so that's still on the "someday" list.

In May, I dyed my Captain America: Civil War Sharon vest.
I still want to try to get the truly screen-accurate vest in the black/grey, but the blue one definitely looks better having been dyed. It needs another coat, but it's progress.

We made a little progress on our Reserve TIE Pilots over the summer. We got our belt buckles sanded down and brushed, but didn't think to glue on the greeblies and seal it immediately, so we ended up with some rust and now have to do it all over again. I also finally got the templates for our jumpsuit modifications.

I tore an inconvenient place (the butt) on my TWS Mall Cap pants over the summer, which is definitely not progress but it was an event, so now I have to replace those.

August was huge just for Labyrinth Masquerade, and was my biggest project completion with French Revolution Zombaes.


The costumes were fantastic, but most happily, we met up with some Instagram costume friends who are now Real Life friends.

In September, I started some Hocus Pocus stuff. So far it's the spellbook and getting fabric swatches, both of which are almost done.

In October, we went to L.A. Comic Con for the first time and wore Ghost!Thomas and Lucille again. Though the costumes were wear-ready, we did make a few substantial upgrades. Ghost!Thomas got new shoes, which my friend painted and look amazing.
I redyed Lucille's robe with a customized Dye-Na-Flow blend. It's still not quite what I want, but a definite improvement over the original dye job.
I also changed the wig. The first wig I had ordered years ago didn't fit me well. The hairline at the temple came way too far forward and completely covered my ears, and there was a weirdly pronounced peak above each temple. At the time I didn't want to deal with it, so I ordered a different style which is what I wore with the costume last year. It worked okay at WonderCon while it was in a braid, but with the hair worn down at Labyrinth it kept wanting to slide off. More experimenting after made me realize it was actually too small, and eventually it got to a point where I couldn't stand wearing it anymore. When we decided to bust the costumes out again for L.A. Comic Con, I didn't have the money to drop on a new lace front, so I got the original back out and tried to make it work. And it actually worked well. I changed the hairline and cut back the lace so it actually fit my ears and looked more natural, and it was so much more comfortable. This was also my first time actually securing the lace with spirit gum. I didn't quite get it pulled over my hairline at the sides (which just says to me I need a still bigger wig), but it looked really nice along the forehead.

We met up again with our friends from Labyrinth, who were Nightgown!Edith and Suit!Thomas, and we got lots of great reactions.
Being in a Crimson Peak group definitely helped with visibility, and the con being right before Halloween and kind of unofficially spooky themed definitely didn't hurt either. It was a completely different experience than WonderCon last year, where we had only a handful of people react and half of those thought my friend was Sweeney Todd and ignored me. We also finally got some nice and varied photos of these costumes, courtesy of our friends.

Wearing all that fabric and a heavy wig all day was too much for my neck though, especially with a flare up having already started the week before, so the week after was fairly miserable and I'm pretty sure that contributed to the solid month of migraines and tension headaches I had in November. So unfortunately, Murder Party Lucille might be relegated to just photoshoots from now on. (More excuse to start thinking about her black velvet park/ghost dress though.)

October was pretty busy, and the day after LACC we did a Hocus Pocus photoshoot at Sunnyside Cemetery as Jay and Ice.
Mostly this was just putting together the costume from purchased pieces, but I also cut and restyled my blonde lace front wig, which coincidentally made it more aesthetic and practical for Cap and more accurate for Civil War Sharon.

In November I finally finished my King George crown, which even with my reputation for unfinished projects probably now holds the record for longest continuous construction time of a single item. But hey, I did finish it.
I just did a recap on this sucker and also what comes next.

So the 2018 breakdown was:
  • 1940s ensembles: completed
  • Lydia Deetz: pockets added, wig restyled
  • TWS Mall Cap: shoe soles repainted, shield modified, wig restyled
  • CW Berlin Sharon: vest dyed, wig restyled
  • Reserve TIE Pilots: buckle construction started, jumpsuit templates acquired
  • French Revolution Zombaes: completed
  • Lucille Nightgown/Robe: new wig, robe redyed, new photos
  • Jay and Ice: completed, new photos
  • Sanderson Spellbook: almost completed
  • King George crown: completed
  • King George cape: pattern acquired
And December has mainly seen the start of some planning...

2018 was supposed to be the year of finishing the unfinished, and it kind of was, but mostly it wasn't. I did revive and revamp Hocus Pocus, but that's very much ongoing and likely won't be done in 2019 (still foolishly aiming for Labyrinth, though). We did a little work on our Reserve TIE Pilots, but not proactively, so those are still on the docket. King George's crown is done, but the other accessories are still an ongoing go. Civil War Sharon is that much closer to done, though Nat isn't, but they're also still really close in general, so hopefully that'll happen. In other ongoing work, we're hoping to finalize concept and design work on Gibson Gothic and Sword-and-Sandal Superheroes, and maybe Lost-Hope Ball too.

There are also some more pending upgrades. We want to upgrade our TWS Cap and Winter Soldier costumes, which we wore just once at an underwhelming SDCC a few years ago and then threw in the closet. I already have a new jacket for Cap, and have my nice shield as well, so this will probably mostly be redoing the Winter Soldier jacket. Our historical events, namely The Revolution and Great L.A. Air Raid, also need modified ensembles.

As far as totally new, we really want to do the TWS Cap Stealth suit and an amalgam MCU Black Widow suit. This is definitely not an outright 2019 goal. Given the scope, it'll be slower progress depending heavily on patterning and workouts (I am determined to be a Dorito). And after seeing Bohemian Rhapsody, we're desperate to do Freddie's party outfit with the crown and a Bowie to go with.

So the rough plan for 2019 is:
  • Winifred Sanderson, Mary Sanderson, and Billy Butcherson (Hocus Pocus)
  • Reserve TIE Pilots (Star Wars)
  • King George III accessories (Hamilton: An American Musical)
  • CW Berlin Sharon and Nat (Captain America: Civil War)
  • Gibson Gothic and/or Sword-and-Sandal Superheroes and/or Lost-Hope Ball designs (historical/original)
  • TWS Cap and Winter Soldier (Captain America: The Winter Soldier)
  • Cap Stealth Suit and Black Widow Tactical Suit (Captain America: The Winter Soldier and MCU)
  • Freddie Mercury party outfit (Bohemian Rhapsody) and David Bowie
  • c. 1783 American Revolution middle-to-upper class ensembles
  • new 1940s ensembles
We'll see what happens. Happy New Year, everyone!

Wednesday, December 19, 2018

Hamilton - King George: Moving Forward

Now that the crown is (finally) done, at least in Version 1.0, as well as the livery collar, star badge, and rhinestone garter, I can start getting back to the big picture plan and thinking about what's next.

Star badge:
I technically have one done, and it's alright. But I've never been totally satisfied with it (I will never be satisfiiiiiied). The show has since premiered on the West End, so I've been able to see the costuming tweaks they made for that new production. Most notably (and relevantly), they gave George an actual metal and rhinestone badge more like the real Order of the Garter rather than the embroidered one from the shows in the U.S. Either way works since both are accurate, and I'm not fussy about mixing costume variations from different shows. At the very least I could just remake the embroidered version. But I just love the way the rhinestone badge looks (*sparkles*). From seeing other people make replica royal orders and orders of chivalry and such, I have half an idea of how to make a star badge like this out of other jewelry pieces. It's an option, and it would probably be another cheap and fairly easy accessory. Time will tell.

Scepter:
I decided I had to have one after seeing the show last September, but I forced myself to put it off until all the other pieces I was working on were done. Now the time has come. I haven't really started planning construction yet. It'll probably be some kind of dowel as a base, and then I'll make the top piece similar to how I made the top of the crown. I need to do more research on it to get good references, so that'll be the first step.

Cape:
While the cape falls in the realm of clothing more than accessories and the costume can be complete without it, it's still a priority over the suit. I think I can wear it and the accessories over something silly and dumb like a red union suit or ironic t-shirt and Union Jack boxers or something as kind of a high-quality gag costume, so that I can still enjoy what I've made so far without waiting on the whole suit. By chance, I was at a thrift store in October and found a costume cape with the perfect shoulder shape. So after months of struggling with picking patterns and doing alterations (more on that later), I can actually start making some real progress on this part. I have some of the materials, though now that the pattern is different I might need to order a little more yardage (fingers crossed that it goes the other way and I'll end up with extra instead), and I still need to buy some of the ribbon trim. But overall, the mockup is ready to start at least.

This monster is still going to move forward casually and at a slow and hopefully somewhat steady pace, but it's going to be a busy few weeks around the holidays and then suddenly school starts again in January. Fingers crossed!

Thursday, November 8, 2018

Hamilton - King George Crown: Finished! (?)

It's been two years in the making, but this dumb sucker is finally finished.


I promised an unveiling, so how about an unwrapping?

This paint is no joke.
My fears about the texture from the primer were substantiated, and a lot of the surface is kind of grainy so then the chrome finish didn't turn out as well as it could have. But the top piece was the cleanest and painted the best. This is just three light coats of the Montana gold chrome on plastic and I can hardly even believe it.

And tada!
Kind of hate how dull and flat everything - even the velvet - looks here, but okay.
Up until the literal moment that I tore the plastic bags off, I was really underwhelmed. After the paint, I felt "eh" partly because of the inconsistent application, but also for reasons I couldn't really pin down. After I pulled the puffy paint mask off the rhinestones and saw those with the paint, I still felt mostly "eh." Maybe it was having been working on it and looking at it in just bits and pieces for so long, maybe it was losing perspective. Don't know. Then when I pulled the bags off and got to see the paint and the rhinestones with the velvet and fur, it suddenly clicked and I fell in love.


I still want to make an improved Version 2.0. That impulse hasn't changed at all. I'd never made anything like this before, and when I started I really wasn't sure how I was going to actually do it and if it would even work. I improvised a lot during the process, learned a whole lot too, and now there's a lot I know how to do better or differently altogether. Just for another challenge, and to be that much more extra accurate, I kind of want to do one in metal. Given how heavy this one is already, one made of metal would probably be for photos and display only, not wearing out to events anywhere. But it would still be pretty fabulous.

But at the very least, I will be making another one with pretty much the same exact materials and overall process. Most stuff I had to buy in more quantity than I needed, so I would only have to reorder a few little things. I can scale the pattern down a little to fit continuously on the 24" length of the plastic sign, so it doesn't need an extension piece and will fit the base hat and my head and frame a bit better. I can also be smarter with painting: get the good sandable primer again, then go straight to black base and the well-proven Montana gold chrome, and glue the rhinestones on last.

Having this done and feeling good enough about the whole process that I'm willing to make a duplicate has also given me the confidence to make another crown of very similar design for a costume that made its way onto my list quite unexpectedly last week, so that'll happen someday too.

In the meantime, with this out of the way, I'm getting back into what's next on this incredibly long haul project. Stay tuned!