Current Projects

Friday, June 4, 2021

WandaVision - "Naughty" 1990s Agatha

WandaVision snuck up on me in a big way. I was glad Wanda was getting more screentime, but I hadn't seen much promo material before the show aired and I had no expectations of getting invested in it, let alone recreating any costumes from it. Then Agatha happened.

It really *was* Agatha all along!

While the show has some issues that really don't sit well with me and definitely spoiled my overall enjoyment, I immediately fell in love with Agatha and the problematic elements didn't damper that. I initially planned to do her 1950s dress from the first episode (and that's in the works), but I quickly found myself theorizing and researching *all* of her costumes (and currently planning to do them all, but we'll see how that goes). On mostly a whim, the first I ended up doing was the most gratuitous—it only has about 30 seconds of screentime, if that—but also the easiest: her 1990s purple velour "Naughty" tracksuit from the opening credits of the seventh episode.


I myself have an edgy velour rhinestoned tracksuit, so it was super relatable. And as I'm still in a costuming rut, something easy to make and comfy to wear was also appealing.

Because the costume felt so indulgent and was meant to be a laid-back project, I didn't want to invest a lot of money in it, so I got a tracksuit second hand and some cheaper (but still beautiful) clear resin rhinestones. The lettering could really be done with any uniform size, and that may be how they made hers, but with only blurry references it's hard to tell. So I got 6mm, 5mm, 4mm, and 3mm to give it some variation.

I made a digital template/stencil of the lettering from screencaps and tweaked it to account for perspective. I don't do much digital work in costuming, so it was fun to use a new tool, even for something basic. I sized it based on standard 8.5x11" printer paper and did some (awkward) mock-up tests, and it ended up being pretty perfect.

Using the template as a stencil, I lightly painted the letters onto the pants with silver Jacquard fabric paint. Referring to both the template and screencaps, I started gluing the largest 6mm rhinestones in the places that looked the most prominent, then went down in size filling in more of the letters. I mostly used the larger sizes for the bulk of the letters, and used the smaller sizes to fill in gaps between them and smooth out edges. This gave the letters a really nice shape. I used E6000 for the gluing based on tutorials by the shop I got the rhinestones from, and it worked great. A wax pencil was also very handy.


This was my first time rhinestoning (?) fabric and it was so much fun. I'm already thinking about doing a second Agatha tracksuit but experimenting by filling in the letters with just tiny 2mm or 3mm rhinestones for a more uniform look. 

There are a few wonky spots where I painted outside the lines or had to remove and reglue rhinestones and left some residue, so I might try to disguise that with some purple paint. The tracksuit I bought also fits a little odd—despite being a matching set, the pants are just this side of indecently tight but kind of perfect that way, but the jacket is a good size too big in comparison. So I may take the jacket in so it fits a little more tightly like hers. But it's completely wearable and overall I'm so, so happy with how it turned out.


I already have a white t-shirt to wear under it, and I'll likely improvise the shoes with some generic sneakers (I do have an old pair of Reeboks that might fit the '90s aesthetic). This would be a great opportunity to skip a wig because my hair is the perfect color, but it's also too short right now. I'm in the process of growing it out so I may wait and see if it's long enough by the time I have a reason to wear this.

I have no definite idea when or where that'll be. At the very least it needs a photoshoot. A friend of mine does a wonderful Wanda (in many different incarnations) so when I fell in love with Agatha I told her I'd be her evil counterpart, and she was so excited when she found out I was doing this costume specifically. It would also be fantastic for a lazy day at a con or for staying in costume but being comfortable during post-con evening shenanigans. I may even be bold enough to wear it in Real Life.

As silly as it is, I love this costume and I'm super glad it was my first completed costume build of the year (and of the pandemic!).

Stay tuned!

*Tagging this as "historical costume" feels so... ugh. Not just because it doesn't feel like historical costuming or look like any of the other historical sewing I do, but also because I lived through the '90s and thinking of that as "historical" in any sense is jarring. But for the sake of accuracy and tagging continuity...


Thursday, June 3, 2021

2020 Recap + 2021 Plans

2020 was an on-fire dumpster of a year for so many reasons. Tallying up costuming accomplishments seems so arbitrary, and finally posting this halfway through 2021 makes the "plans" aspect kind of futile. But looking back on the things I still enjoyed and managed to get done admittedly feels kind of good.

HB Revolution
After distressing the chemise dresses for French Revolution Zombaes at Labyrinth 2019, they were pretty much unusable for anything else (except maybe pirate shenanigans). I hadn't made new ones and didn't have the time or energy to try mocking up something else Revolution-esque in time for HB Revolution, so I went in "normal" clothes. At the time I didn't really mind it, though I regretted the decision just a little when we met up with some friends who were dressed impeccably (and came to regret the decision more as every other costumed event of the year was cancelled, at which point it would have been nice to have done costumes at HB Revolution).


Great L.A. Air Raid
This was the only costumed event of the year, and if I'd known that at the time, I might have done things a little differently. I basically just reused the costume from the previous year: fur-collared coat, red blouse, vintage sailor pants, brass airplane pin. I actually got another pair of the sailor pants that fit better though, and in place of the usual pearls I used a vintage scarab bracelet as a necklace and wore matching earrings. My hair was longer than the previous year and I was experimenting with a new style so the curls and overall style didn't work well or last long or look all that great.

Everything from March onward—WonderCon, Pirate Invasion, SDCC, Labyrinth, and L.A. Comic Con—was cancelled.

So a decrease of events and an increase in stress meant all old plans for the year went completely different, and summer started as a big ol' depressive marathon. I did a lot of other things—puzzles, reading, bingewatching, sewing lots and lots of masks, catching up on posting last year's costumes and events—for a few months, until by July I started working some active costuming back in.

King George
In working on other projects since finishing my King George crown, I'd kind of lost steam on the project. But the release of the filmed performance over the summer motivated me to think about it again, so I started working on version 2.0 of the crown and ordered new materials. I also demolished and then scrapped plans for the livery collar. I'd initially planned to take the original apart and reuse as many materials as possible for a remake, but when I decided to scrap plans for the cape too (or at least postpone it indefinitely) the collar became obsolete. The new plan is for the crown (version 2.0), suit, chest badge (version 2.0), and the scepter, to match what he wears for most of the show.

Hocus Pocus
I didn't mean to fall back into this, but as the Halloween season was approaching I was in my spoopy feels and couldn't leave it alone. Mostly I just did more fabric swatches and the research that goes into that. Nearly all of Winifred's fabrics have been decided and some bloomers and petticoat fabric has been ordered (I'll be constructing the outfit from the inside out for ease and to cut costs), and fabric choice progress has been made on Mary and Billy too. I also started making Winifred necklaces again, more accurate with upgraded materials, and started gathering materials for spellbook 2.0.


1780s/1900s Summer Hat
This is far from finished, but I've been thinking about it for years so I still count starting it as a win. It'll be a light, summery, Provence-inspired straw hat with fabric crown and floral decoration meant to straddle both the 1780s and early 1900s.

Non-costuming craft projects
With events being cancelled and not having any real reason to make costumes, in addition to (or sometimes in place of) sewing I did a lot more general prop and crafting projects than usual. I finally made the witchy moon lamp and Sleepy Hollow horseshoe "artifact" I've been wanting for years and carved two fake pumpkins.

The 2020 "breakdown" was:

  • 1940s ensemble: new pants, new accessories
  • King George: crown 2.0 started
  • Hocus Pocus: more swatches ordered/organized, spellbook 2.0 started
  • new 1780s/1900s hat started
  • general spoopy decor crafting

I don't even know how to plan for 2021 right now. Things are still so up in the air, I'm trying not to get my hopes up for any events or big projects until things change in a more positive direction. But if anything, I can keep picking away at the incomplete bits and pieces that have been on the list the last few years. At the very least I'm hoping to work on the King George crown 2.0 and the Hocus Pocus spellbook 2.0.

  • continue design work on Gibson Gothic, Sword-and-Sandal Superheroes, and/or Lost-Hope Ball
  • continue fabric/pattern/construction research on the Sanderson Sisters and Billy Butcherson
  • Winter Soldier: plan construction for new jacket
  • Civil War Sharon Carter: new shirt
  • Alexei: new pants, new shirt
  • Ice: new pants, new jacket for events 
  • French Revolution Zombaes: continue weathering dresses, continue experimenting with makeup
  • 18th century Lydia: add lace collar, maybe additional accessories, practice new makeup
  • 18th century Beetlejuice: new zone front gown
  • new 18th century chemise gowns
  • continue research on WWII reenactment portrayals: WAC, WAVES
  • random small vintage projects: blouses, shorts, pants, skirts, etc.

Monday, March 22, 2021

Hamilton - King George Crown 2.0

He said "you'll be back" and he was right.

My King George crown has been done for about two years now, and even right after I finished it I thought about the inevitable version 2.0. I've been staring at the crown for all that time but never had the motivation to jump back into it. I'd kind of moved on, both to other parts of the King George costume and just other projects entirely. But with the show being released in film format last summer, I got the bug again and started finally making steps towards version 2.0 with some specific upgrades and changes: template size, gold surface, and rhinestone details.

The main problem with the original template for the horizontal fleur-de-lis and cross band was the length. It was too long for the 24" sign I used as the base material, so the cross in the back had to be cut from a separate piece and glued in which was a little unsightly. The finished length was also longer than the band on the base hat which was about 23", creating a gap between the crown piece and the hat and widening the profile. It made the whole thing a little bobble-headed and oversized on me.

So for 2.0, I remade the template in a few different sizes. I liked the size of the individual fleur-de-lis and crosses themselves so I wanted to just shorten the length of the piece rather than completely scale it down. The only place to do that was in the gaps between the fleur-de-lis and crosses, and on the last template I basically removed that whole gap.


The finished length was almost exactly 24" and it didn't disrupt how the fleur-de-lis and crosses sit next to each other (they weren't squished too close together) so it worked perfectly.

The other, and even more problematic, big issue was the gold finish. I went through so many paints on the first version before finally settling on the Montana Gold chrome. It looked pretty dang good, even though I botched the primer and didn't get as clean a finish as I could have. But it didn't take long for the finish to corrode with fingerprints and what I can only describe as oxidization. That's because I didn't seal it, which at the time was a trade-off for not dulling down the bright finish. It's been frustrating to see the paint darken and dull, but I was able to make peace with it after deciding that first crown was a prototype and knowing I'd do an improved remake. But I don't want to use paint again, at least not spray paint, so that puts me back at square one for the gold again.

One of the first gold tests I did way back on the first crown was an adhesive vinyl/mylar sort of stuff.


At the time time I scrapped it because I couldn't get it to behave how I wanted on the curved strips: it lays nice on the outside of the curve, but on the underside the edges buckled and wouldn't stay adhered even with notches cut. But I'd loved how amazingly reflective it is. This time I played with it a little more and figured out some ways around the earlier problems, and decided that was what I'd use for the second crown.

Good color, amazing surface, pretty resilient stuff considering I've had the same sheet of it for at least six years (if not longer) and it hardly has a blemish. (The scratches and dimples on this test piece are from not cleaning the plastic surface before applying it and intentionally scratching it to see just how resilient it is.)

But then I started really comparing it to the finish on the stage-used crown instead of just hyperfixating on "ooh, shiny!" and I realized the stage crown has more of a soft finish.

Still super gold, still smooth. But it's not like a mirror. So now I'm rethinking the surface again, which continues to be the biggest challenge to this whole prop. Next step will probably be getting samples of some adhesive vinyls that are a softer, kind of brushed gold instead of mirrored to see how I like that finish. I'm also thinking about finding someone who can cut the pieces out of brass for me.

The other and most superficial upgrade is all the little bits and bobs on the crown, namely rhinestones and metal filigree stampings. What I used the first time worked really well, but there was room for improvement. I bought all the rhinestones in silver settings rather than gold, figuring they wouldn't show or I could just paint them along with the rest of the crown, but gold settings would be better (especially now that I'm not doing any real painting). Some rhinestones ended up a little too small based on my size estimates, and others I realized after more research were the wrong shape. I also wanted to add some of the filigrees that I'd skipped the first time.

So:
-5mm red cabochons and 18mm clear cabochons on the top cross -> flat-back rhinestones. The rhinestones aren't necessarily more accurate, but they match the faceted design of all the other stones so the continuity looks more aesthetically pleasing to me.
-4mm round clear individual rhinestones on the ball -> 6mm rhinestone sparse chain. The larger rhinestones better match the proportions, and the sparse chain includes the gaps between stones.
-4mm round clear rhinestones on the gold squares -> 4mm and 5mm on the squares that have oval gems, and just 5mm on the plain squares. The 4mm rhinestones kind of got lost next to everything else and the finished result looked a little more subtle than is accurate, so the 5mm will be more sparkly and ostentatious. 5mm doesn't quite fit on the edges around the oval gems, so those will stay 4mm.


-Add the setting under the 13x18 red oval rhinestones on the vertical strips. Don't know why I skipped these.
-Large cluster of 3mm and 4mm rhinestones around the 8mm clear rhinestones on the fleur-de-lis -> just three 4mm rhinestones on each side of the 8mm trio.

-6x12 navette clear rhinestones on the crosses -> 5x10 clear rectangle rhinestones. The rectangle shape looks more accurate and has a slightly larger profile so again, more sparkly and ostentatious.
-18mm round clear rhinestones in center of crosses -> 18mm square rhinestones. The square is more accurate.
-Add the rectangular filigrees to the edges of the crosses. I don't know why I skipped them last time.
-Use larger clovers and add the flat-back gold pearls around the 18mm rhinestones in the cross centers. Just more accurate. I have two options: the filigree clover which is larger and open (just wire-work, not a solid piece) or the plain setting which is solid and smaller. The solid setting is more accurate and will be easier to glue neatly, but the wire filigree has cleaner edges.


-Add extra square filigrees at the top of each vertical strip. I skipped them before because I thought the curve of the strip would be too extreme to get the filigrees to lay flat enough. This time I'm just going to make it work.
-3mm round clear rhinestones -> all removed or replaced with 4mm. Some of the 3mm were ultimately unnecessary, and the others were too small to be appropriately noticeable.

There are also some other incidental changes to materials and construction. Getting rid of basically all painting meant the ball at the top has to be shiny gold already, so I'm switching to a gold Christmas ornament for that. I'll also be adding patches of black fur to the white fur trim instead of coloring the fur.

Since I've done this once before and was pretty pleased with the result despite mostly having no idea what I was doing, I'm pretty confident in this second version.

Saturday, February 20, 2021

2019 Recap + 2020 Plans

I still can't believe we're on the other side of 2020. Sounds fake, but okay.

Obviously this is way old by now. But 2019 was the last normal year of costuming and I actually did a lot, so continuing the process of catching up on old stuff I still wanted to go back and recap it.

2019 was a really busy year. I'm pretty sure it set a new record for costumes + events, or at least was a strong peak.

In February I went back to The Revolution in Huntington Beach, but in costume for the first time.


Using last year's French Revolution Zombaes costume as a base, I made new petticoats, neckerchiefs, jewelry, and a hat for the event.

I also made it back to the Great L.A. Air Raid in a different 1940s ensemble.

The pearl necklace, blouse, cardigan, coat, and oxfords were all from my closet. The coat was from my closet and modified with a fur collar from the stash. I turned a brass airplane stamping into a brooch, and bought a pair of vintage U.S. Navy uniform pants. We got there later than last year but stayed until the dance ended and the MPs started rounding people up, and went to the after-party on the Queen Mary which was a blast (and turned into a rare, impromptu photo op).

In March I went to WonderCon as per usual. The first day I did flight suit Carol Danvers and my friend did the SHIELD disguise variant.
We pulled the costumes together in about two weeks between seeing the movie and the event. It was the first time we've done costumes while the source material was still fresh, and it was fun getting to take advantage of all the Captain Marvel hype. Despite how casual the costumes are, we got a lot of great reactions and had a great time. We were also super fortunate to take part in the Marvel photoshoot.
I bought the flight suit and patches, and used a blonde wig, aviators, and boots I already had. I fixed the fit issue with my wig (which I've been using for a few years now for Cap) by cutting a slit in the lace behind the ears so the lace could sit further forward over my actual hairline. It was my first time doing a pulled-back hairstyle with a lace front, and also the first time fully gluing down the hairline, and I'm really pleased how well it worked.

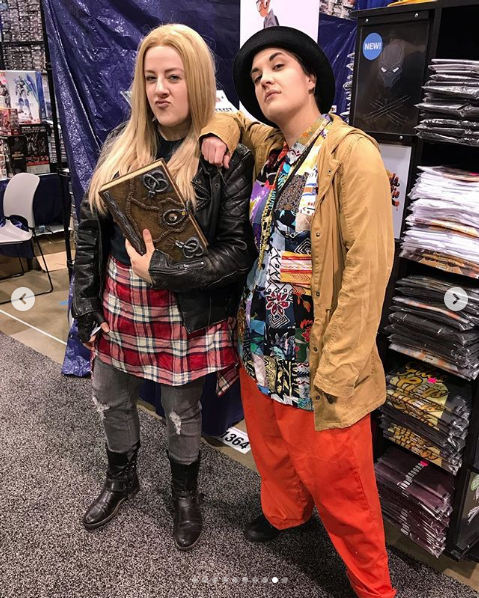
The second day we were Jay and Ice from Hocus Pocus, which was kind of a dud.
The people who got it absolutely loved it which was great, but not many people got it, so after how popping the Carols were the day before it was kind of eh. On the plus side, we did run into a Dani at the end of day which was super fun.
The only thing new about the costume after making it the previous October was getting new pants (which ended up too big and now need yet another replacement), using an alternate plaid shirt, and finishing Winifred's spellbook as an extra prop. I wore the same jacket I used for a photoshoot the year before, which looks absolutely perfect, but it was way too uncomfortable for an event so that'll need an alternate eventually.

In June I went to Pirate Invasion again after skipping the year before. For convenience, French Revolution Zombaes were the base again. My friend went pirate-y with hers, and I did more or less a variation of the HB Revolution ensemble with an upgraded hat, the FRZ wig, and some flashier jewelry.

The event was unfortunately generally underwhelming and at some points actually disappointing, which also ended up meaning no photos, but the costumes were fun.

Most shocking of all, in July I made it back to San Diego Comic Con for the first time in something like five or six years. It was completely unexpected and fairly last minute, as far as what planning for SDCC usually requires. A friend was on a panel and invited us along, so we were able to get badges for just that day and share an AirBnB with her. It was an Avengers cosplay panel and she was wearing her Scarlet Witch, so I did flight suit Carol Danvers again and my friend did Captain America: Civil War Natasha Romanoff to go with the Marvel theme for the day.

We also got to do the Marvel photoshoot again.
The flight suit from WonderCon needs a few repairs so I actually wore a different suit (same design, newer manufacture date) with the same patches, and used the same boots and wig and sunglasses, and added a black undershirt and dog tags.

We spent the rest of the weekend just being tourist-y in San Diego, checking out the outdoor stuff at the convention center and exploring Old Town. (And I did my first ever 10k for the 50th anniversary of the moon landing that Saturday!)

I had also prepped Civil War Sharon Carter for SDCC as an alternate costume choice.
I continued dyeing the blue/brown vest, but it turned out kind of terrible so I ended up buying two more of the same Banana Republic vest in slight color variations. I managed to get the actual screen accurate gray/gray vest (!!!) but it's just a little too small, so that's being saved for "someday." The other new vest was the gray/brown variant, and a black fabric marker took care of the brown trim so it looks pretty dang good. The costume is technically complete now, but the shirt was never ideal (too crisp white) and got stained somewhere in transit to/from San Diego so it needs to be replaced.

In August I had Labyrinth Masquerade again. I still can't believe this has sort of become just a normal yearly event now. Friday night was the return of French Revolution Zombaes.

FRZ got an upgrade with weathered dresses, the wigs from HB Revolution, and new makeup. They still need to be weathered a lot more, but it was fun to get it started.

On Saturday we debuted 18th century Beetlejuice.

Things were hit and miss. I finished Lydia (minus the neckline ruffle) and I'm really happy with it. For Beetlejuice, the mockup process took longer than expected and I ran into some last minute pattern problems, so I had to change plans and do a quick chemise gown instead of the zone front I had designed. But it still worked.

I turned 30 (gasp!) which was and still is kind of horrifying. So I guess I get to join the Cosplay Over 30 community now. ¯\_(ツ)_/¯

In October we went to L.A. Comic Con, but not in costume. A family emergency the day before took all the energy and excitement out of me, and I'm really glad I still decided to go to the con because it was a nice distraction, but I'm also glad I skipped a costume and went plainclothes instead. Alexei "Smirnoff" from Stranger Things had been the plan, and I more or less finished the costume (but no photos yet), so like Sharon it's just waiting for some upgrades and an opportunity to be debuted.

So the 2019 breakdown was:
  • c. 1780s middle-class ensembles: new shift, new petticoats, new shoes, new hat
  • 1940s ensemble: new pants, modified coat, new accessories
  • Flight suit Carol Danvers: completed and upgraded (new flight suit, added undershirt and dog tags)
  • Ice: new button-up shirt, new pants
  • Sanderson spell book: completed
  • Civil War Sharon Carter: completed
  • French Revolution Zombaes: weathered dresses, new sashes, new makeup, new wigs
  • 18th century Beetlejuice and Lydia: completed
  • Alexei: completed
And for 2020...

2019 burnt me out in a lot of ways, and I'd vowed that 2020 would be the year of "chill" costuming: casual research on to-do costumes, little upgrades and tweaks to existing costumes, and picking just one major (though still smaller than usual) sewing project for the year. This plan lasted until about February, and then quickly fell further and further apart.

So the new plan was kind of no plan, but tentative stuff that has been dabbled with:
  • continue design work on Gibson Gothic, Sword-and-Sandal Superheroes, and/or Lost-Hope Ball
  • continue fabric/pattern/construction research on the Sanderson Sisters and Billy Butcherson
  • Civil War Winter Soldier: plan construction for new jacket
  • Civil War Sharon Carter: new shirt
  • Alexei: new pants, maybe new wig
  • Ice: new pants, new jacket for events 
  • French Revolution Zombaes: continue weathering dresses, continue experimenting with makeup
  • 18th century Lydia: add lace collar, maybe additional accessories, practice new makeup
  • 18th century Beetlejuice: new zone front gown
  • continue research on WWII reenactment portrayals: WAC, WAVES
  • random small vintage projects: blouses, shorts, pants, skirts, etc.
Stay tuned!